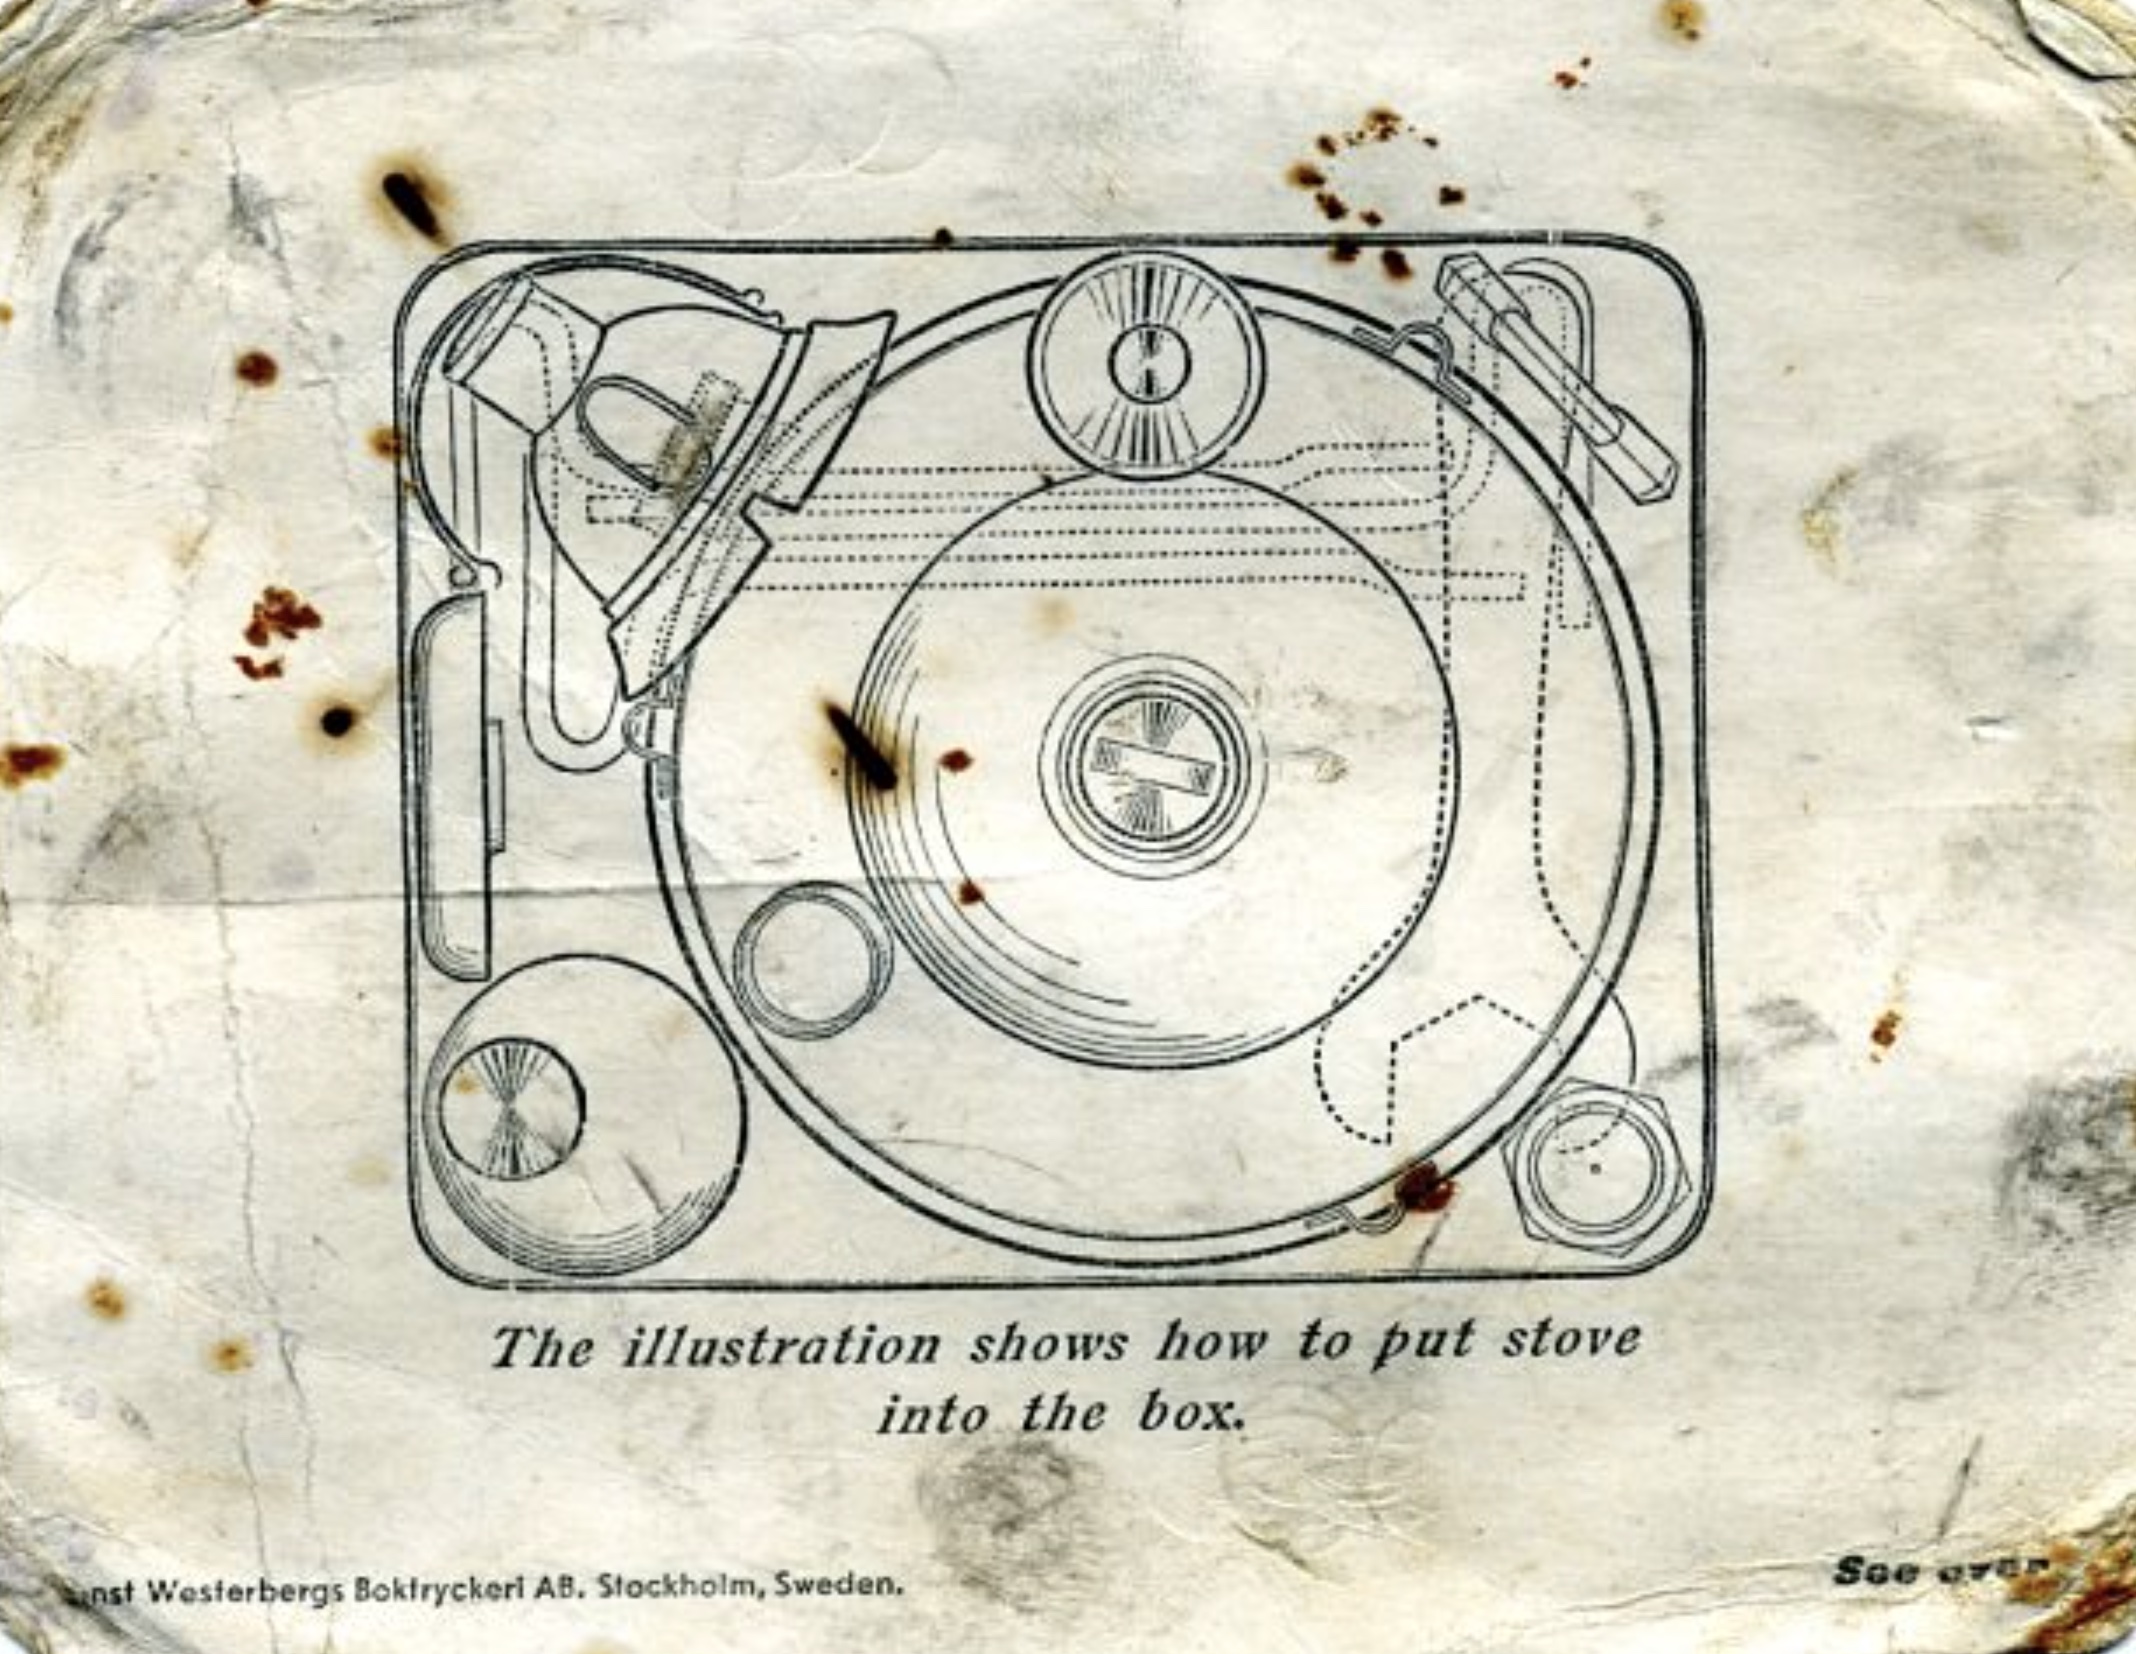
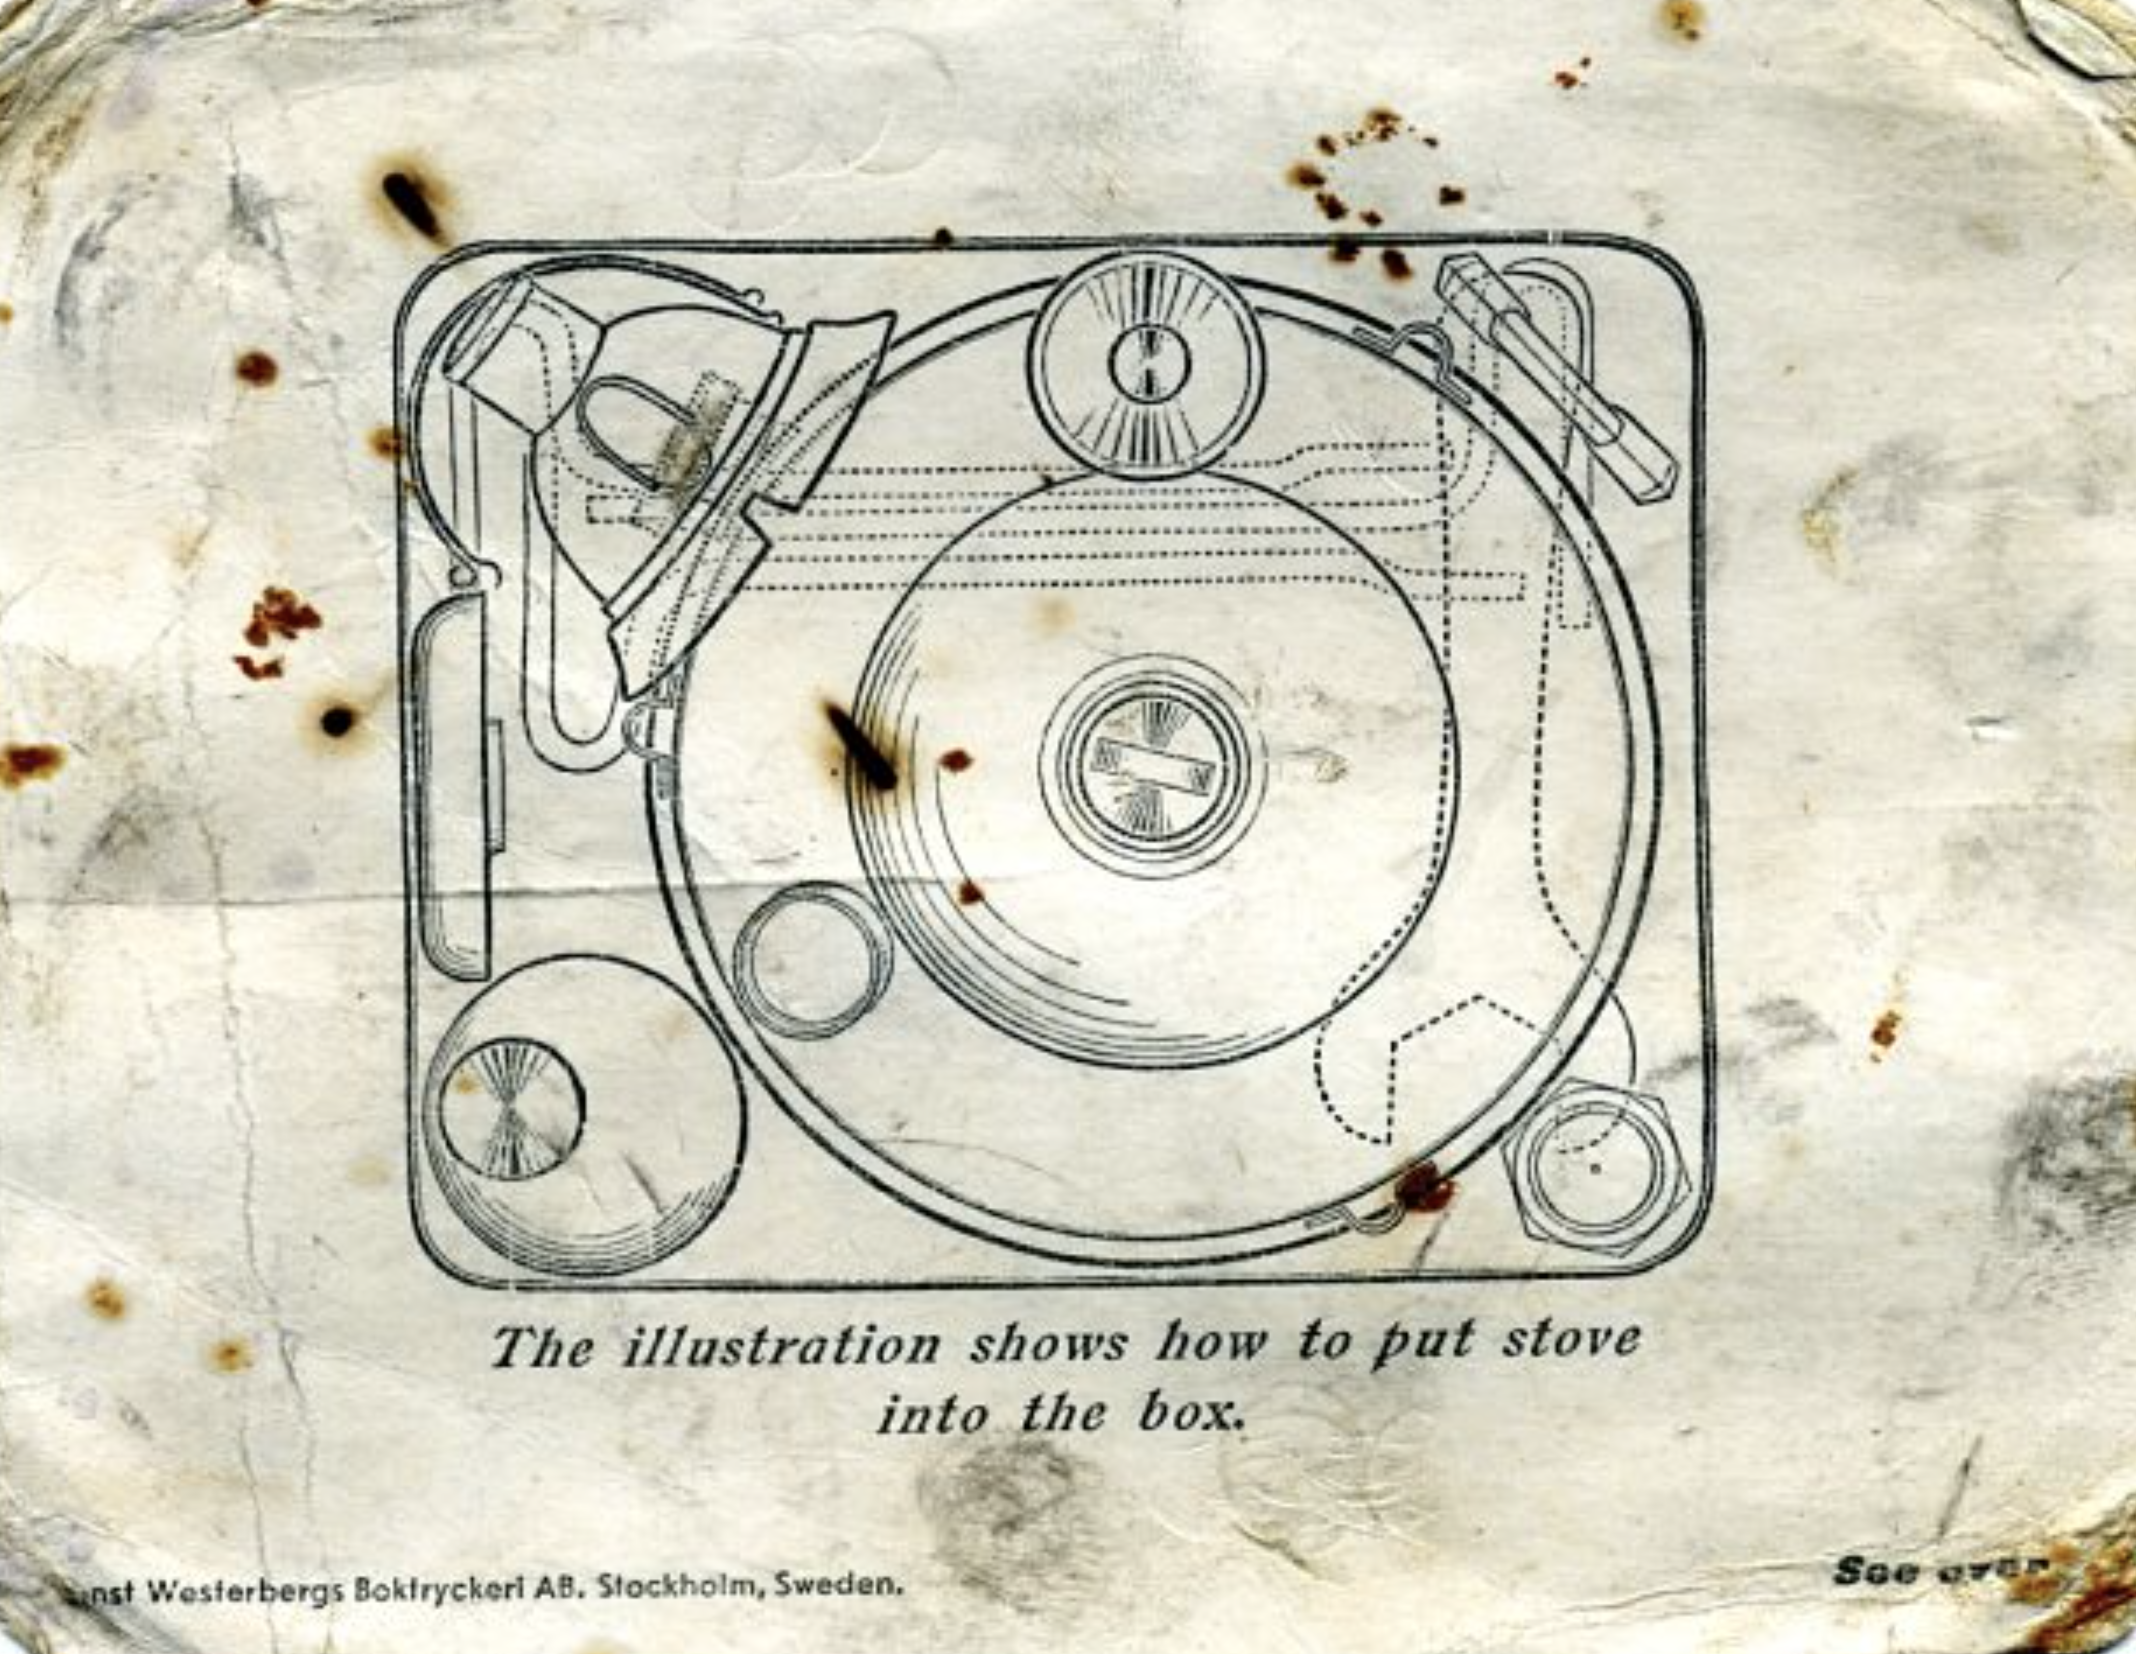
Radius “Special Silent” UFO Silent Burner Cap Compatibility

Hi BD
Can I use the Radius UFO silent cap on a standard silent burner?
Signed, Silent Guy

Nope. Sorry, Silent Guy. A lot of people don’t realize that there is a size difference between the two types of burners. The Radius “Special Silent” burner is substantially smaller than the standard #5-sized silent burner.

“Special Silent” on the left, standard #5 sized burner on the right

If the spigot tube on the “Special Silent” (aka the UFO burner) looks smaller than the #5 spigot tube, that’s because it is. The “Special Silent” spigot tube has an outer diameter of 14.5mm while the OD on the #5 burner is 16mm. So, no way the UFO cap will fit on the #5 burner.

If you have not got a #5 burner in hand, here’s how the “Special Silent” compares to a standard sized #1 roarer burner. Hope that helps. BD


Stove Part Supplier Links

Here’s a list of stove part suppliers that I’ve used or know about. As I think on it, I may add more, so check back frequently. Pretty sure this list is current as of December 2021. These suppliers tend to come and go in many cases. If I’m wrong about a supplier drop me an email and I’l investigate/fix it. If I’ve listed your outfit and you don’t want to be listed just let me know in an email. If you find a dead link or if you know of a link I should add, please let me know by emailing: bd@berniedawg.com and I’ll try to add, update or remove it as required as soon as possible. Thanks!

USA:
EU
UK:
Australia:
South Korea:
Taiwan:
  • philbeagle (Various stove/lantern parts) – https://www.ebay.com/usr/philbeagle/       I can no longer recommend the British Military #12 silent cap from Philbeagle as it has undergone revisions that make it a poor performer without significant modifications involving re-machining some of the parts.
  • simonchantwus_gmail (PentaWrenches, stove and lantern parts) – https://www.ebay.com/str/supercorselantern
  • chi5972 (stove and lantern fabricated parts) –
  • https://www.ebay.com/usr/chi5972/
  • kitelamp (sells remakes of various hard-to-find stove and lantern accessories) Has moved away from eBay and sells directly through this website – https://www.kitelamp.com Has lots of really good and awesome products!
  • ama3736 https://www.ebay.com/str/BOTEXX-TOOLS/ eBay seller sells a small number of parts and graphite packing for many stoves – sadly has now decided (1/2021) that “shipping costs too much” for them to ship products to Canada, Hawaii and much of the rest of the world. ???? Still ships to the mainland USA and the UK at this time, but I’d suggest going to KiteLamp for standard sized graphite packings for a better deal instead: https://www.kitelamp.com/en/product/graphite-ring_en/?v=7516fd43adaa

Svea 123 or 123R Spindle Key Uses

The Swedish-made Svea 123R is a great stove. The “R” means it has a built-in cleaning needle. The spindle key that comes with the vintage stoves has several cut-outs in the key. The purpose of the cut-outs is to lighten the spindle key, to allow the key to dissipate heat and to serve as useful tools for the stove in the field. Here is a quick explanation of the functions of the tool cutouts in the spindle key.

Swedish-made Svea 123R with spindle key

Spindle key detail

Svea 123R – Loosen fuel cap

Svea 123R – Adjust spindle nut and tighten graphite packing

Svea 123R – loosen/tighten jet

The predecessor of the Svea 123R is the Svea 123 (it has no “R” in the stove name.) The spindle key that was bundled with Svea 123R stoves also had cutouts for this earlier version, the Svea 123. The keys were used interchangeably during the years that both types of stoves were co-produced.

Svea 123R stove on right. Svea 123 (no R) on the left.

The spindle nut is smaller on the Svea 123, and the opening in the photo below is used to tighten or loosen the spindle nut. Usually used to tighten the nut as the graphite packing in the spindle wears with use.

This part of the tool is for the spindle nut on the Svea 123 (no R)

This part of the tool is for the smaller jet on the Svea 123 (no R)

The cheaply made and low quality Optimus Svea 123R stoves now coming out of Taiwan still feature a spindle key that includes the opening for the Svea 123 spindle nut even though the Taiwanese never made that stove and that stove stopped being produced in Sweden pre-1970.

Some people, new to these sorts of stoves, or with little background on these stoves, will claim that the Taiwan stoves are of equal quality. But, sadly, those people have never had a genuine Swedish-made Svea in their hands. It is fairly well documented on social discussion forums about stoves that the Taiwanese Svea 123R stoves are of lesser fit and finish than the original Swedish made stoves. There have been quite a few reports about failures to positively shut-off straight out of the box. In my own work repairing stoves I have had a half dozen brand new Taiwanese Svea 123Rs sent to me in just the last year for failures to positively shut-off. The spindle seats are often poorly formed and the brand new stoves will leak right out of the box. If you are considering the purchase of a Svea 123R, PLEASE buy a used vintage one. There are lots of them around and they are much better made than the poor quality Taiwan stoves.

NRV Head Dimensions

Hi BD
I want to fix my old stove and I need to get the NRV out of the pump tube to replace the old rotten pip. I tried to buy one of those NRV wrenches from S. Korea and, then, from the UK, but those sellers don’t seem to be able to ship overseas due to COVID-19. Can you tell me the dimensions of the NRV head, please?
TIA, Old Stove Guy
Hi, Old Stove Guy
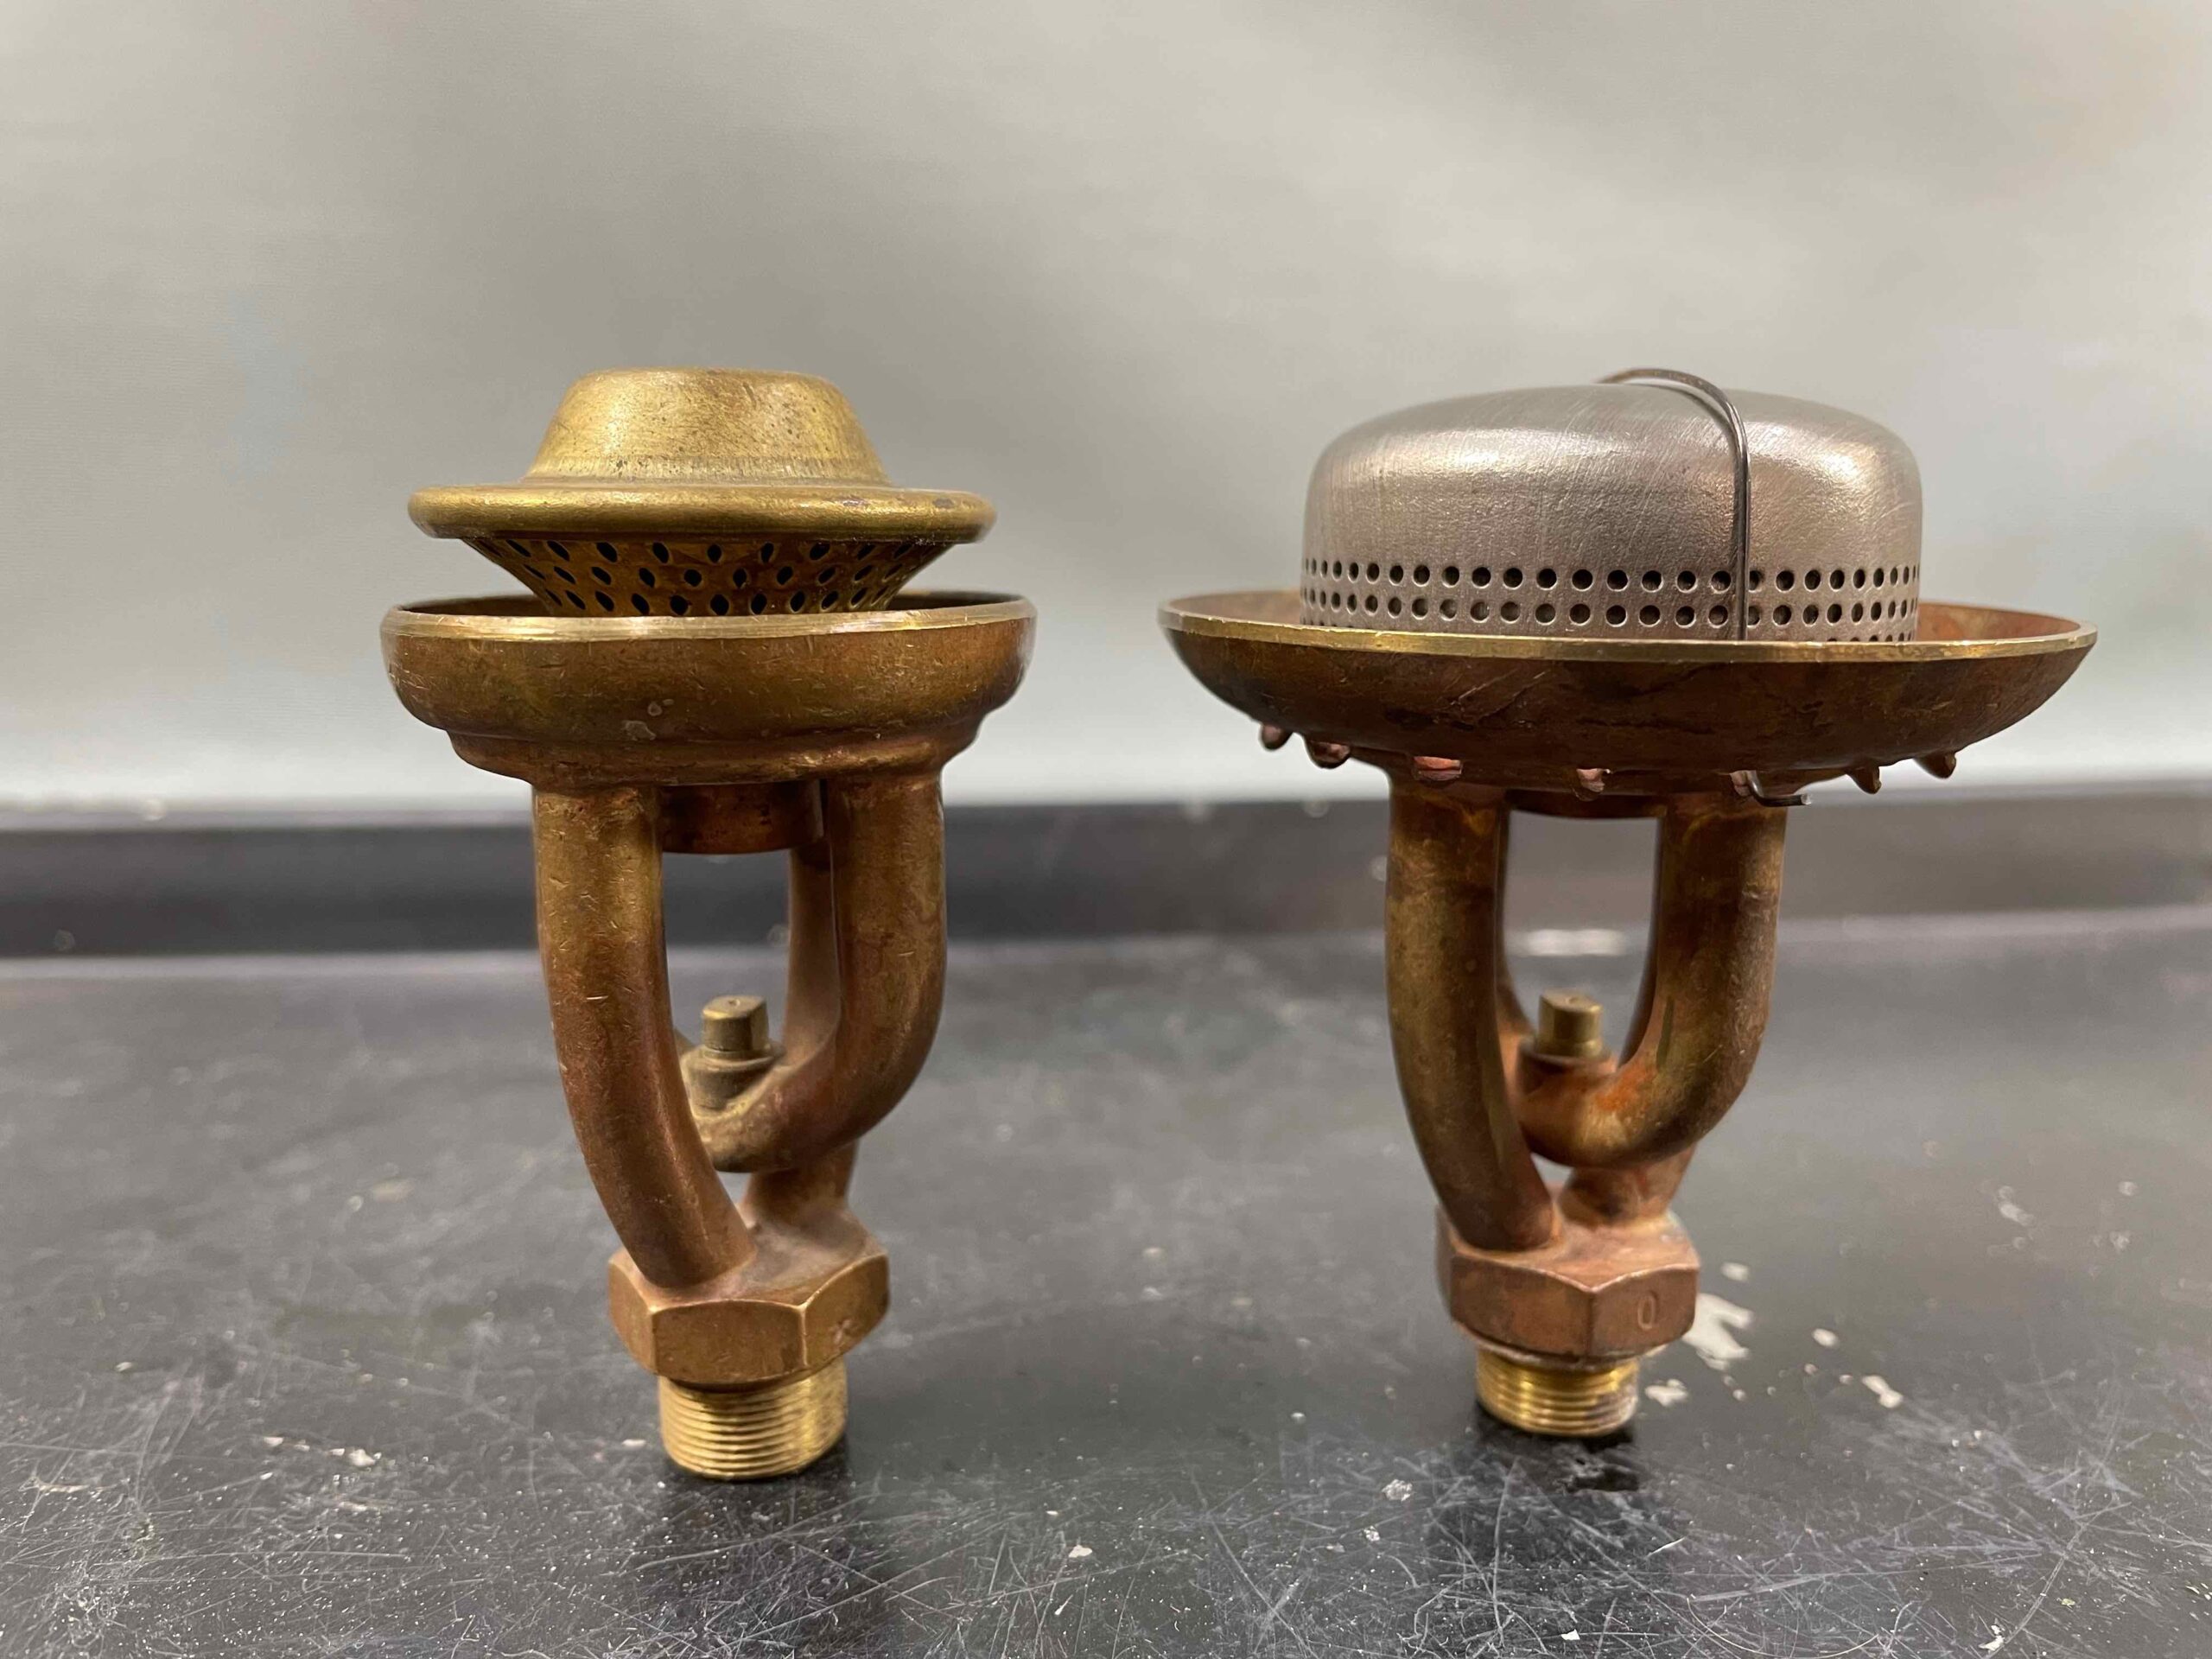
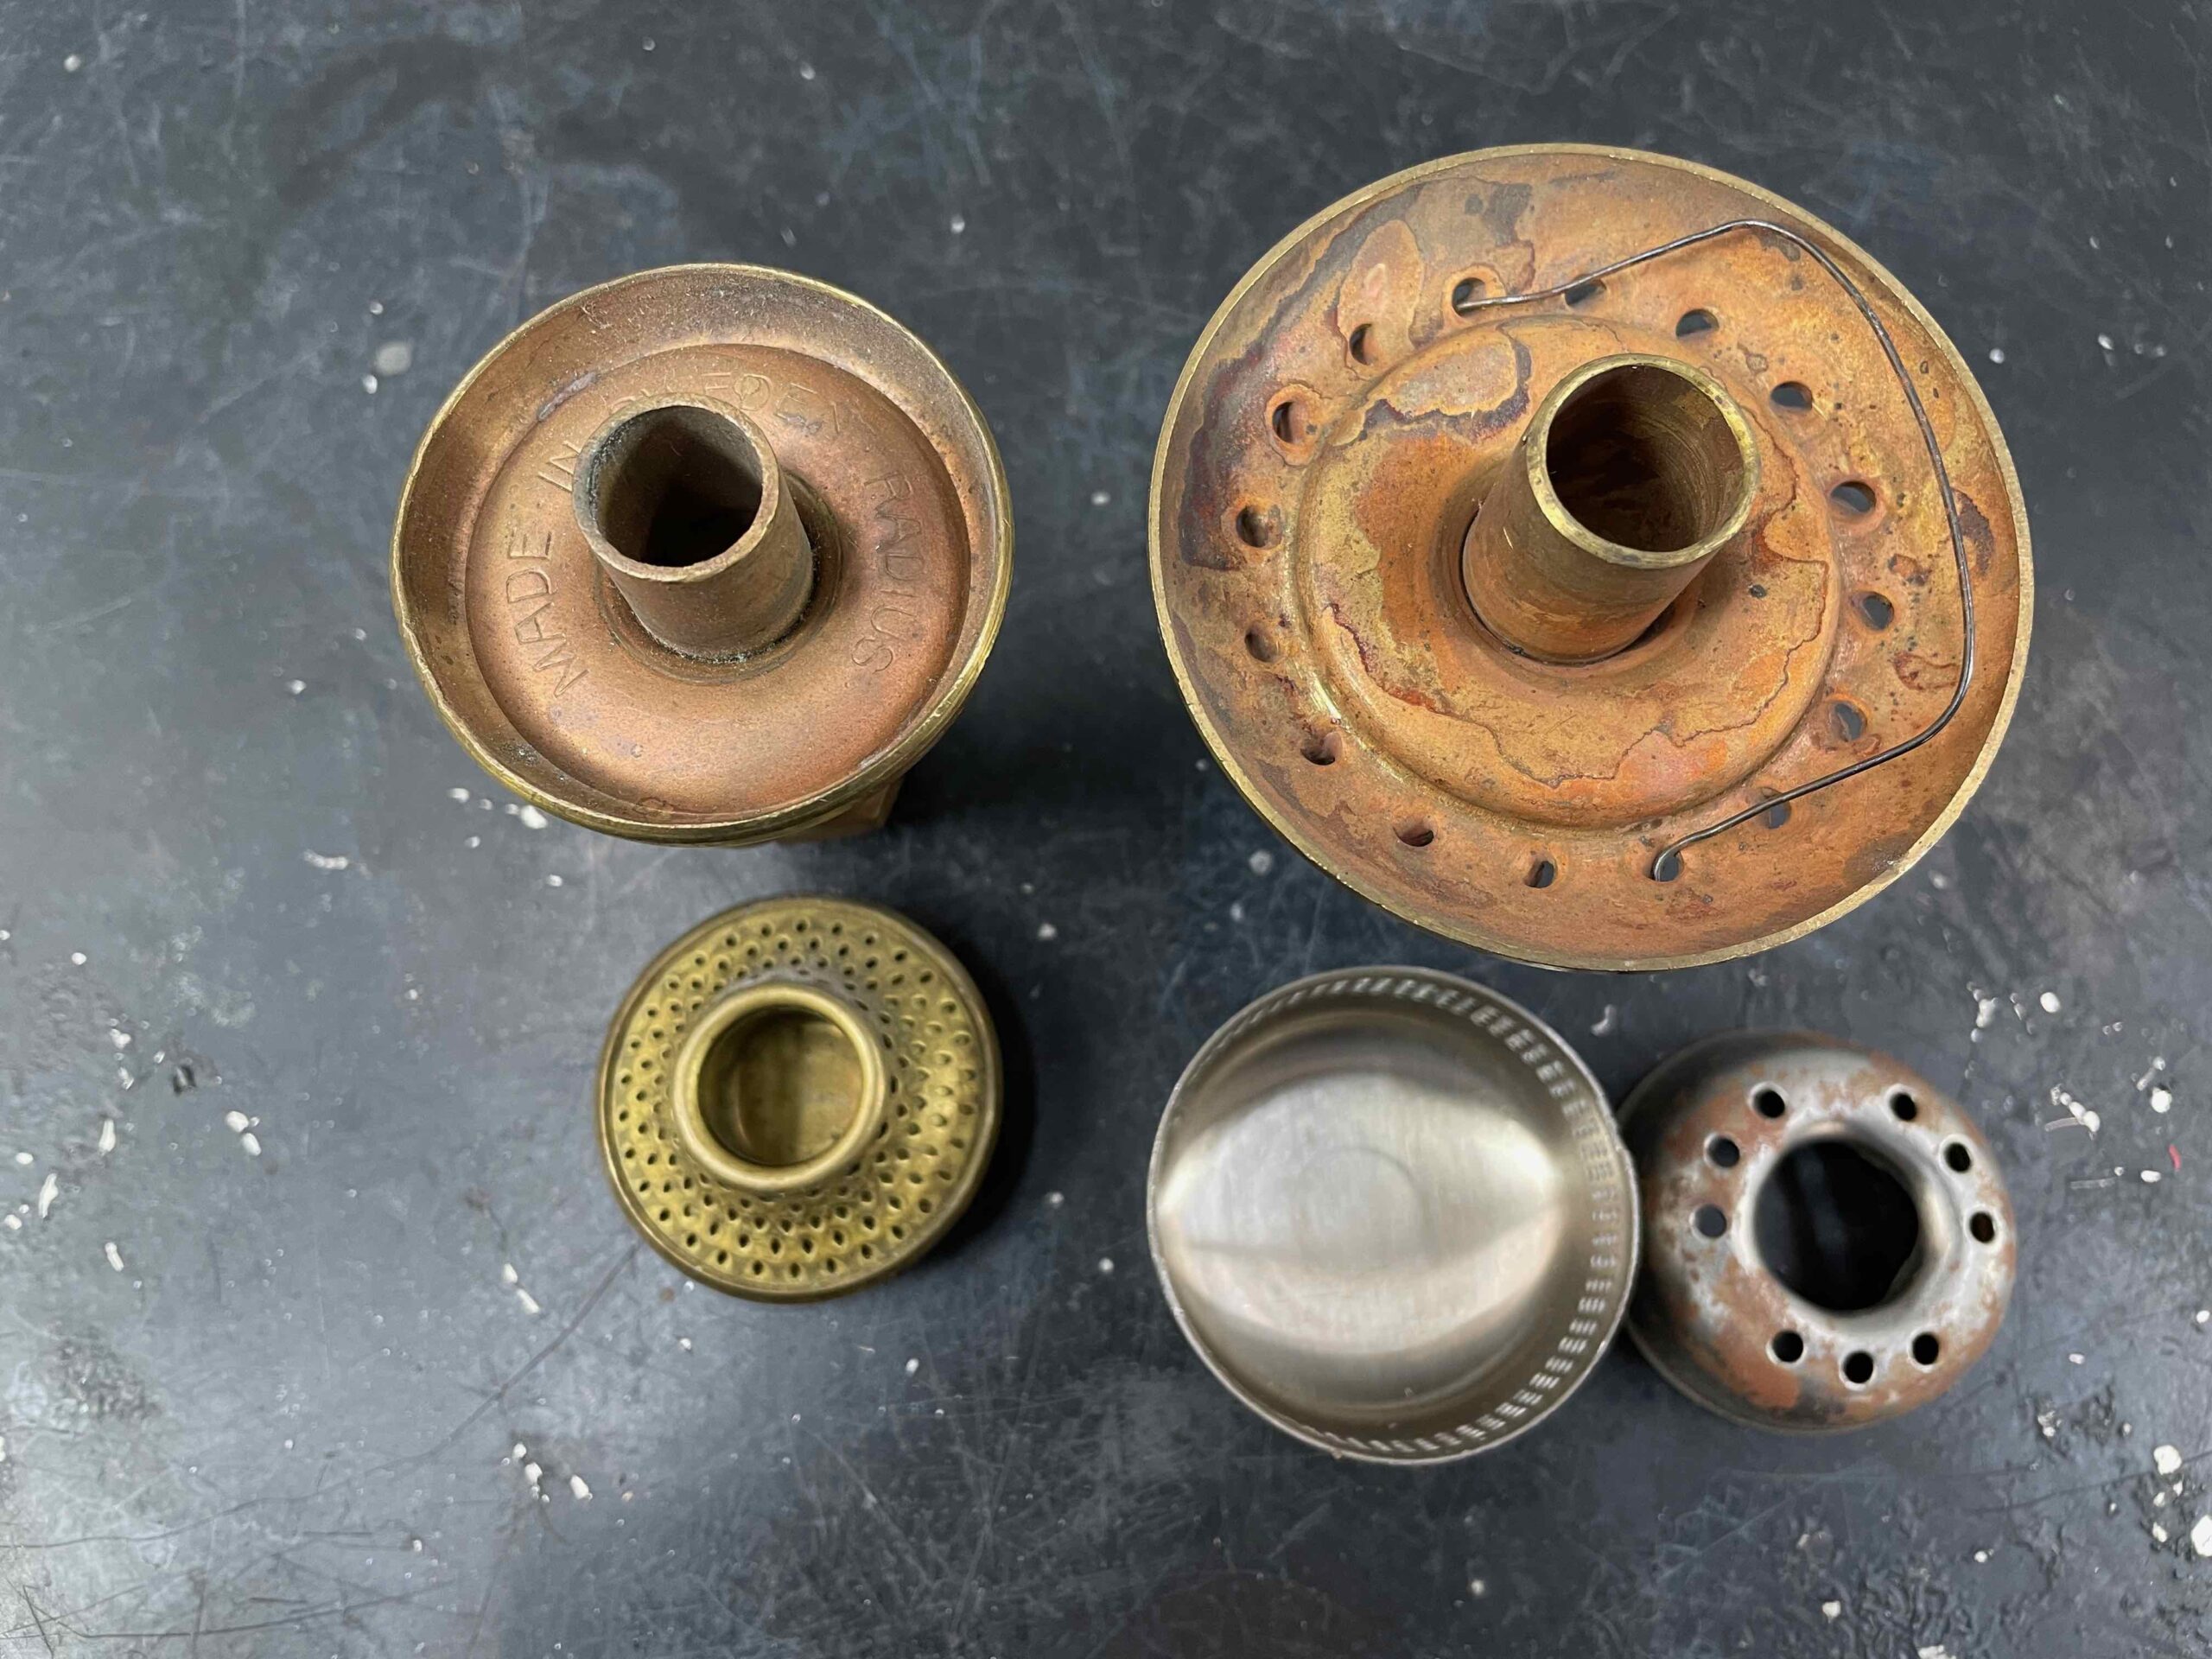
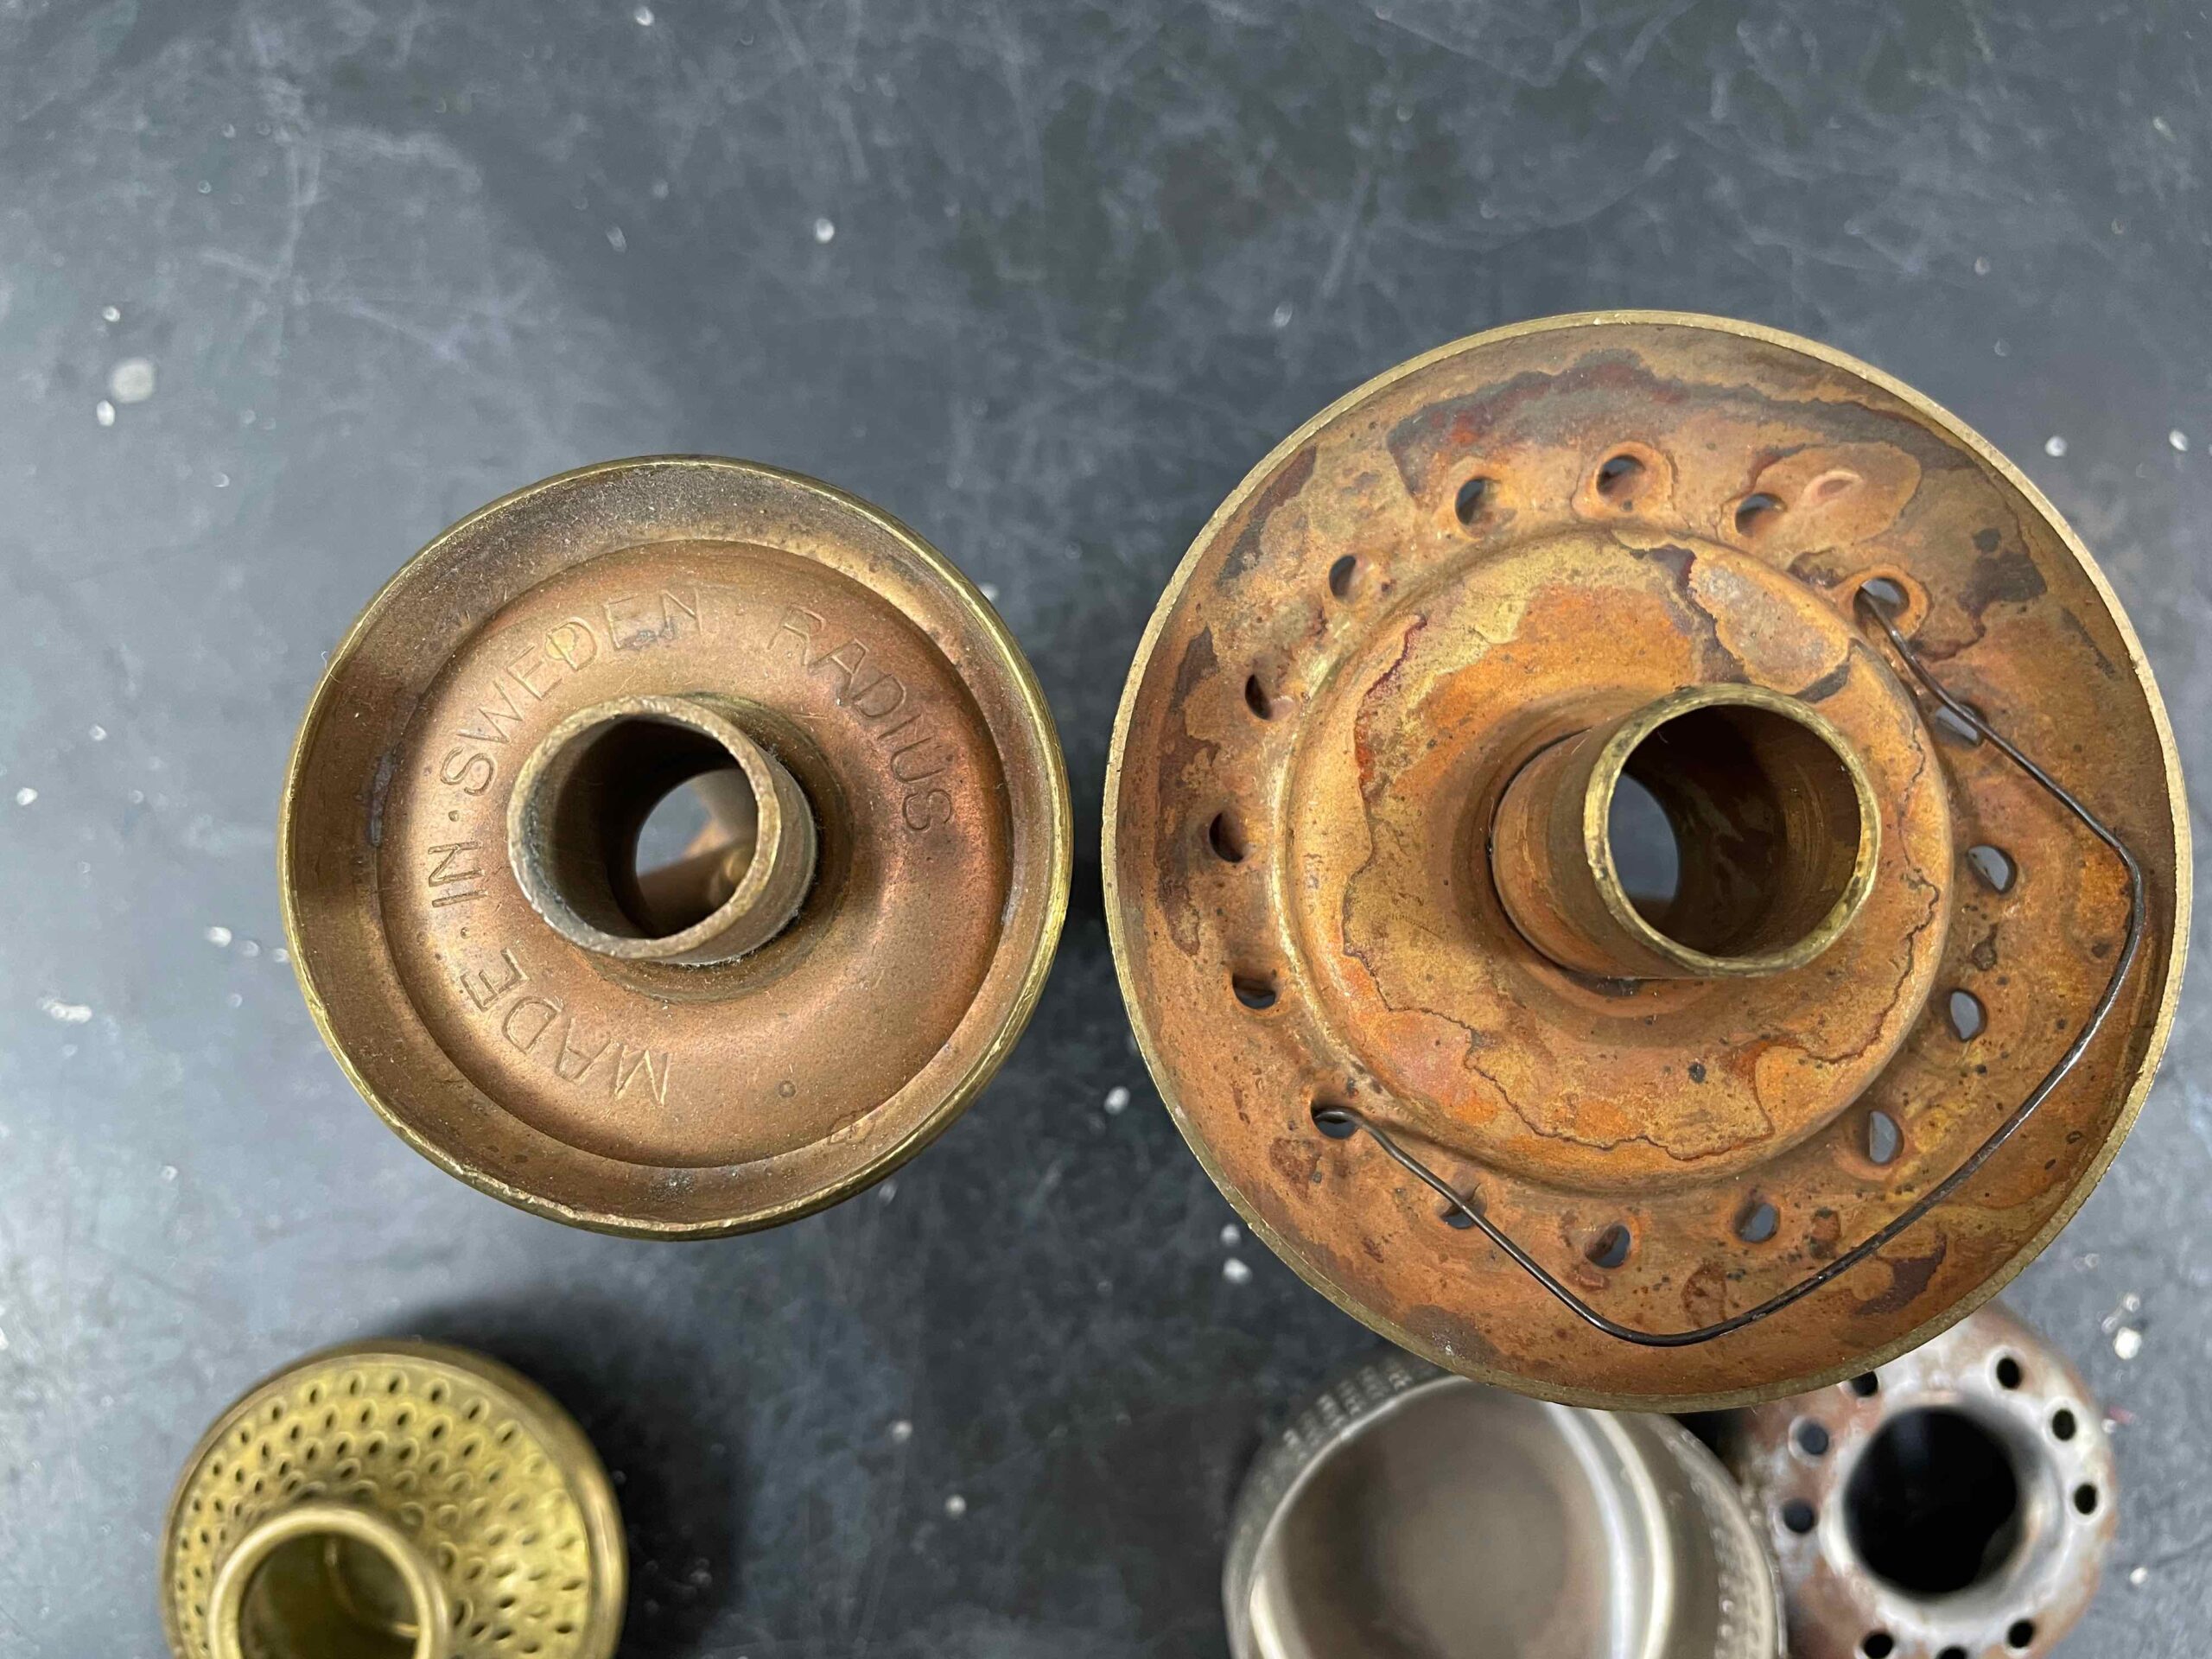
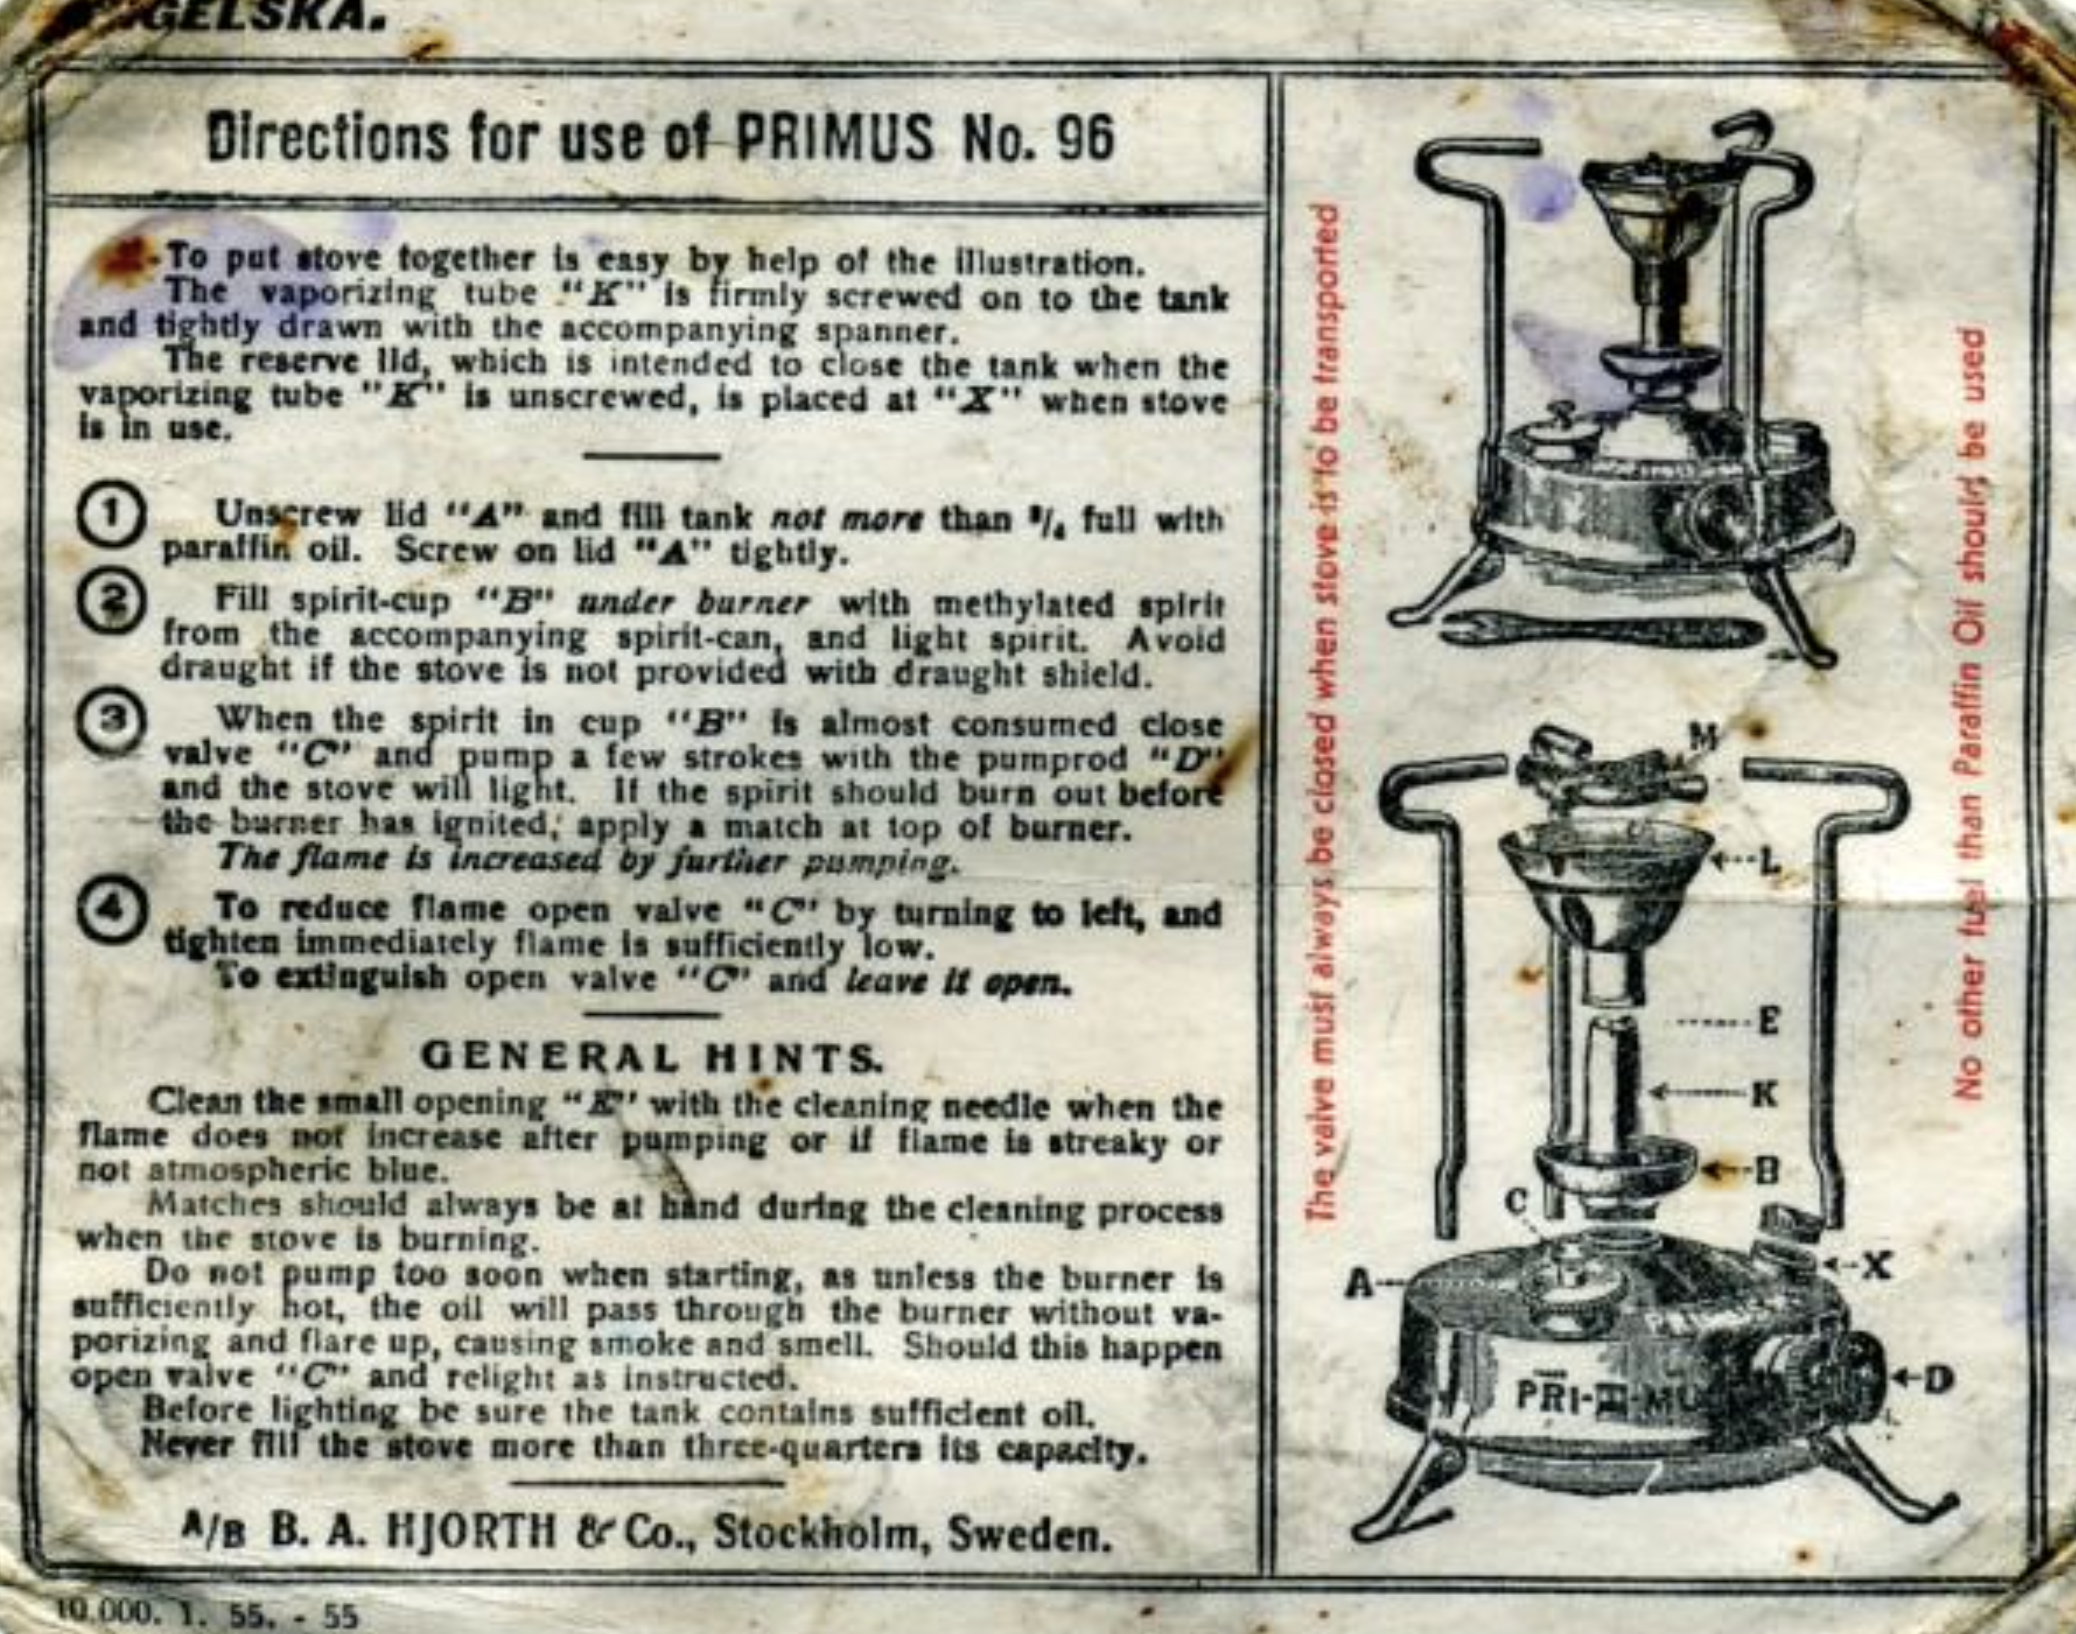
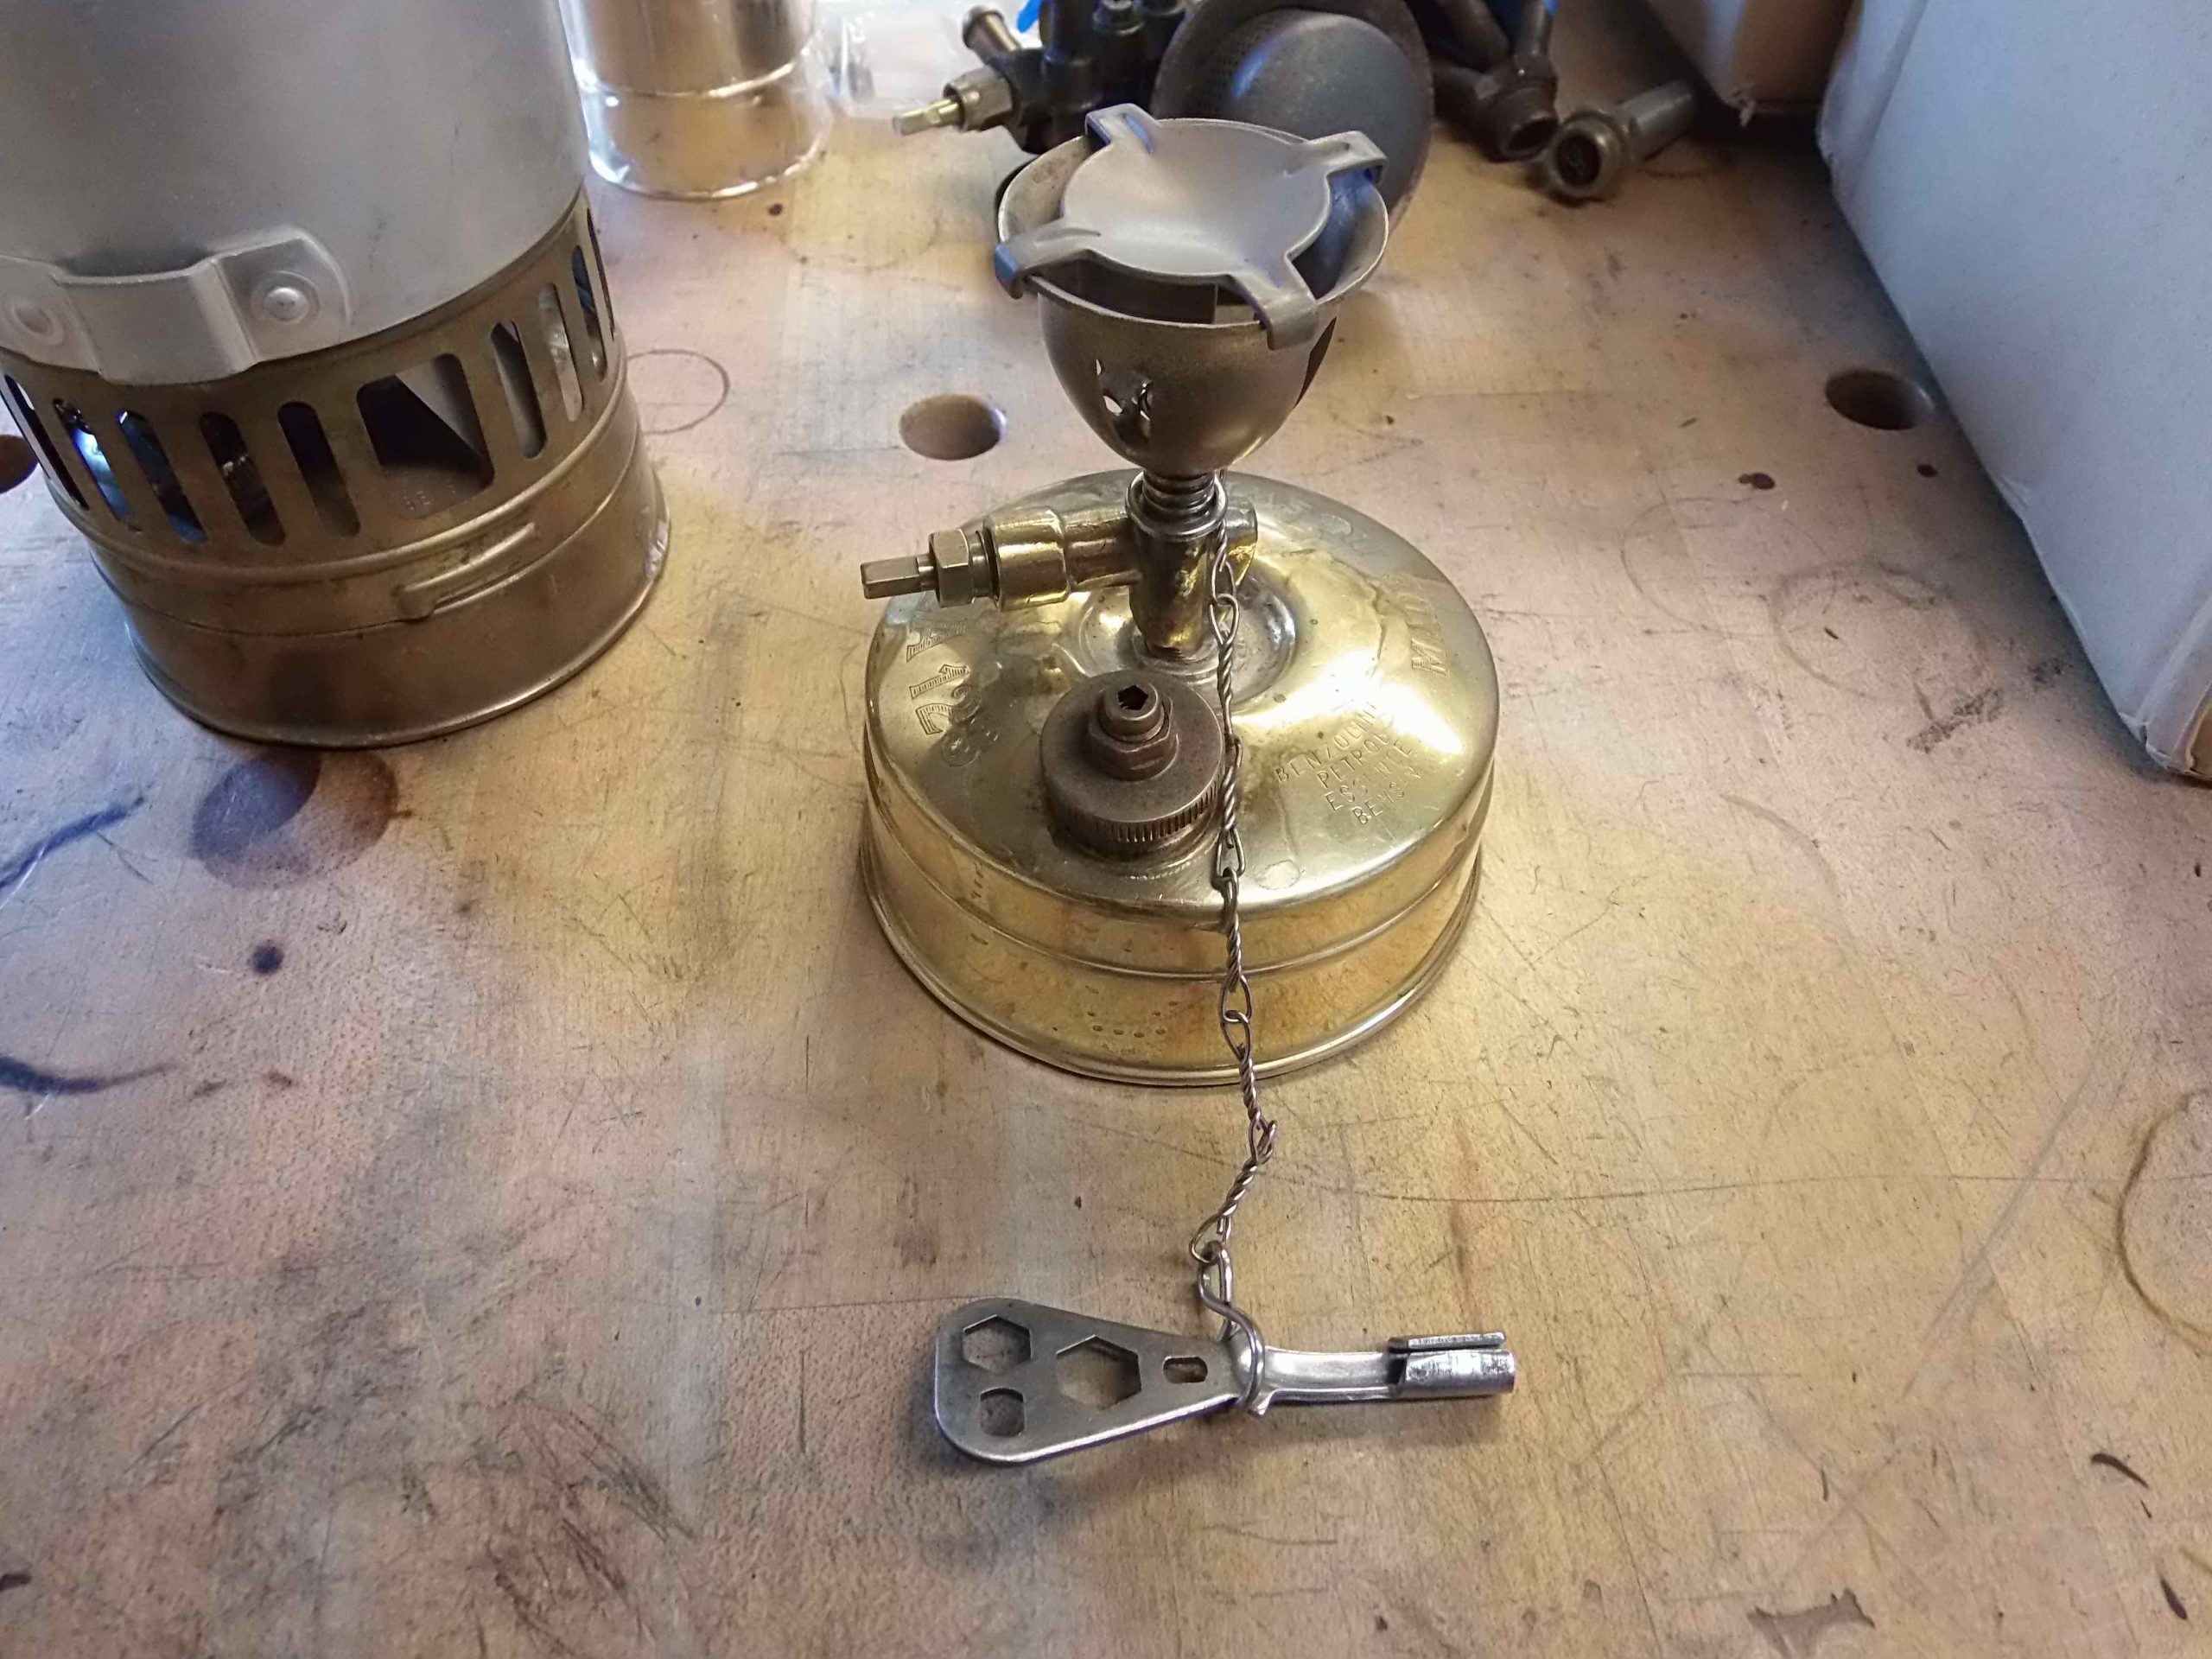
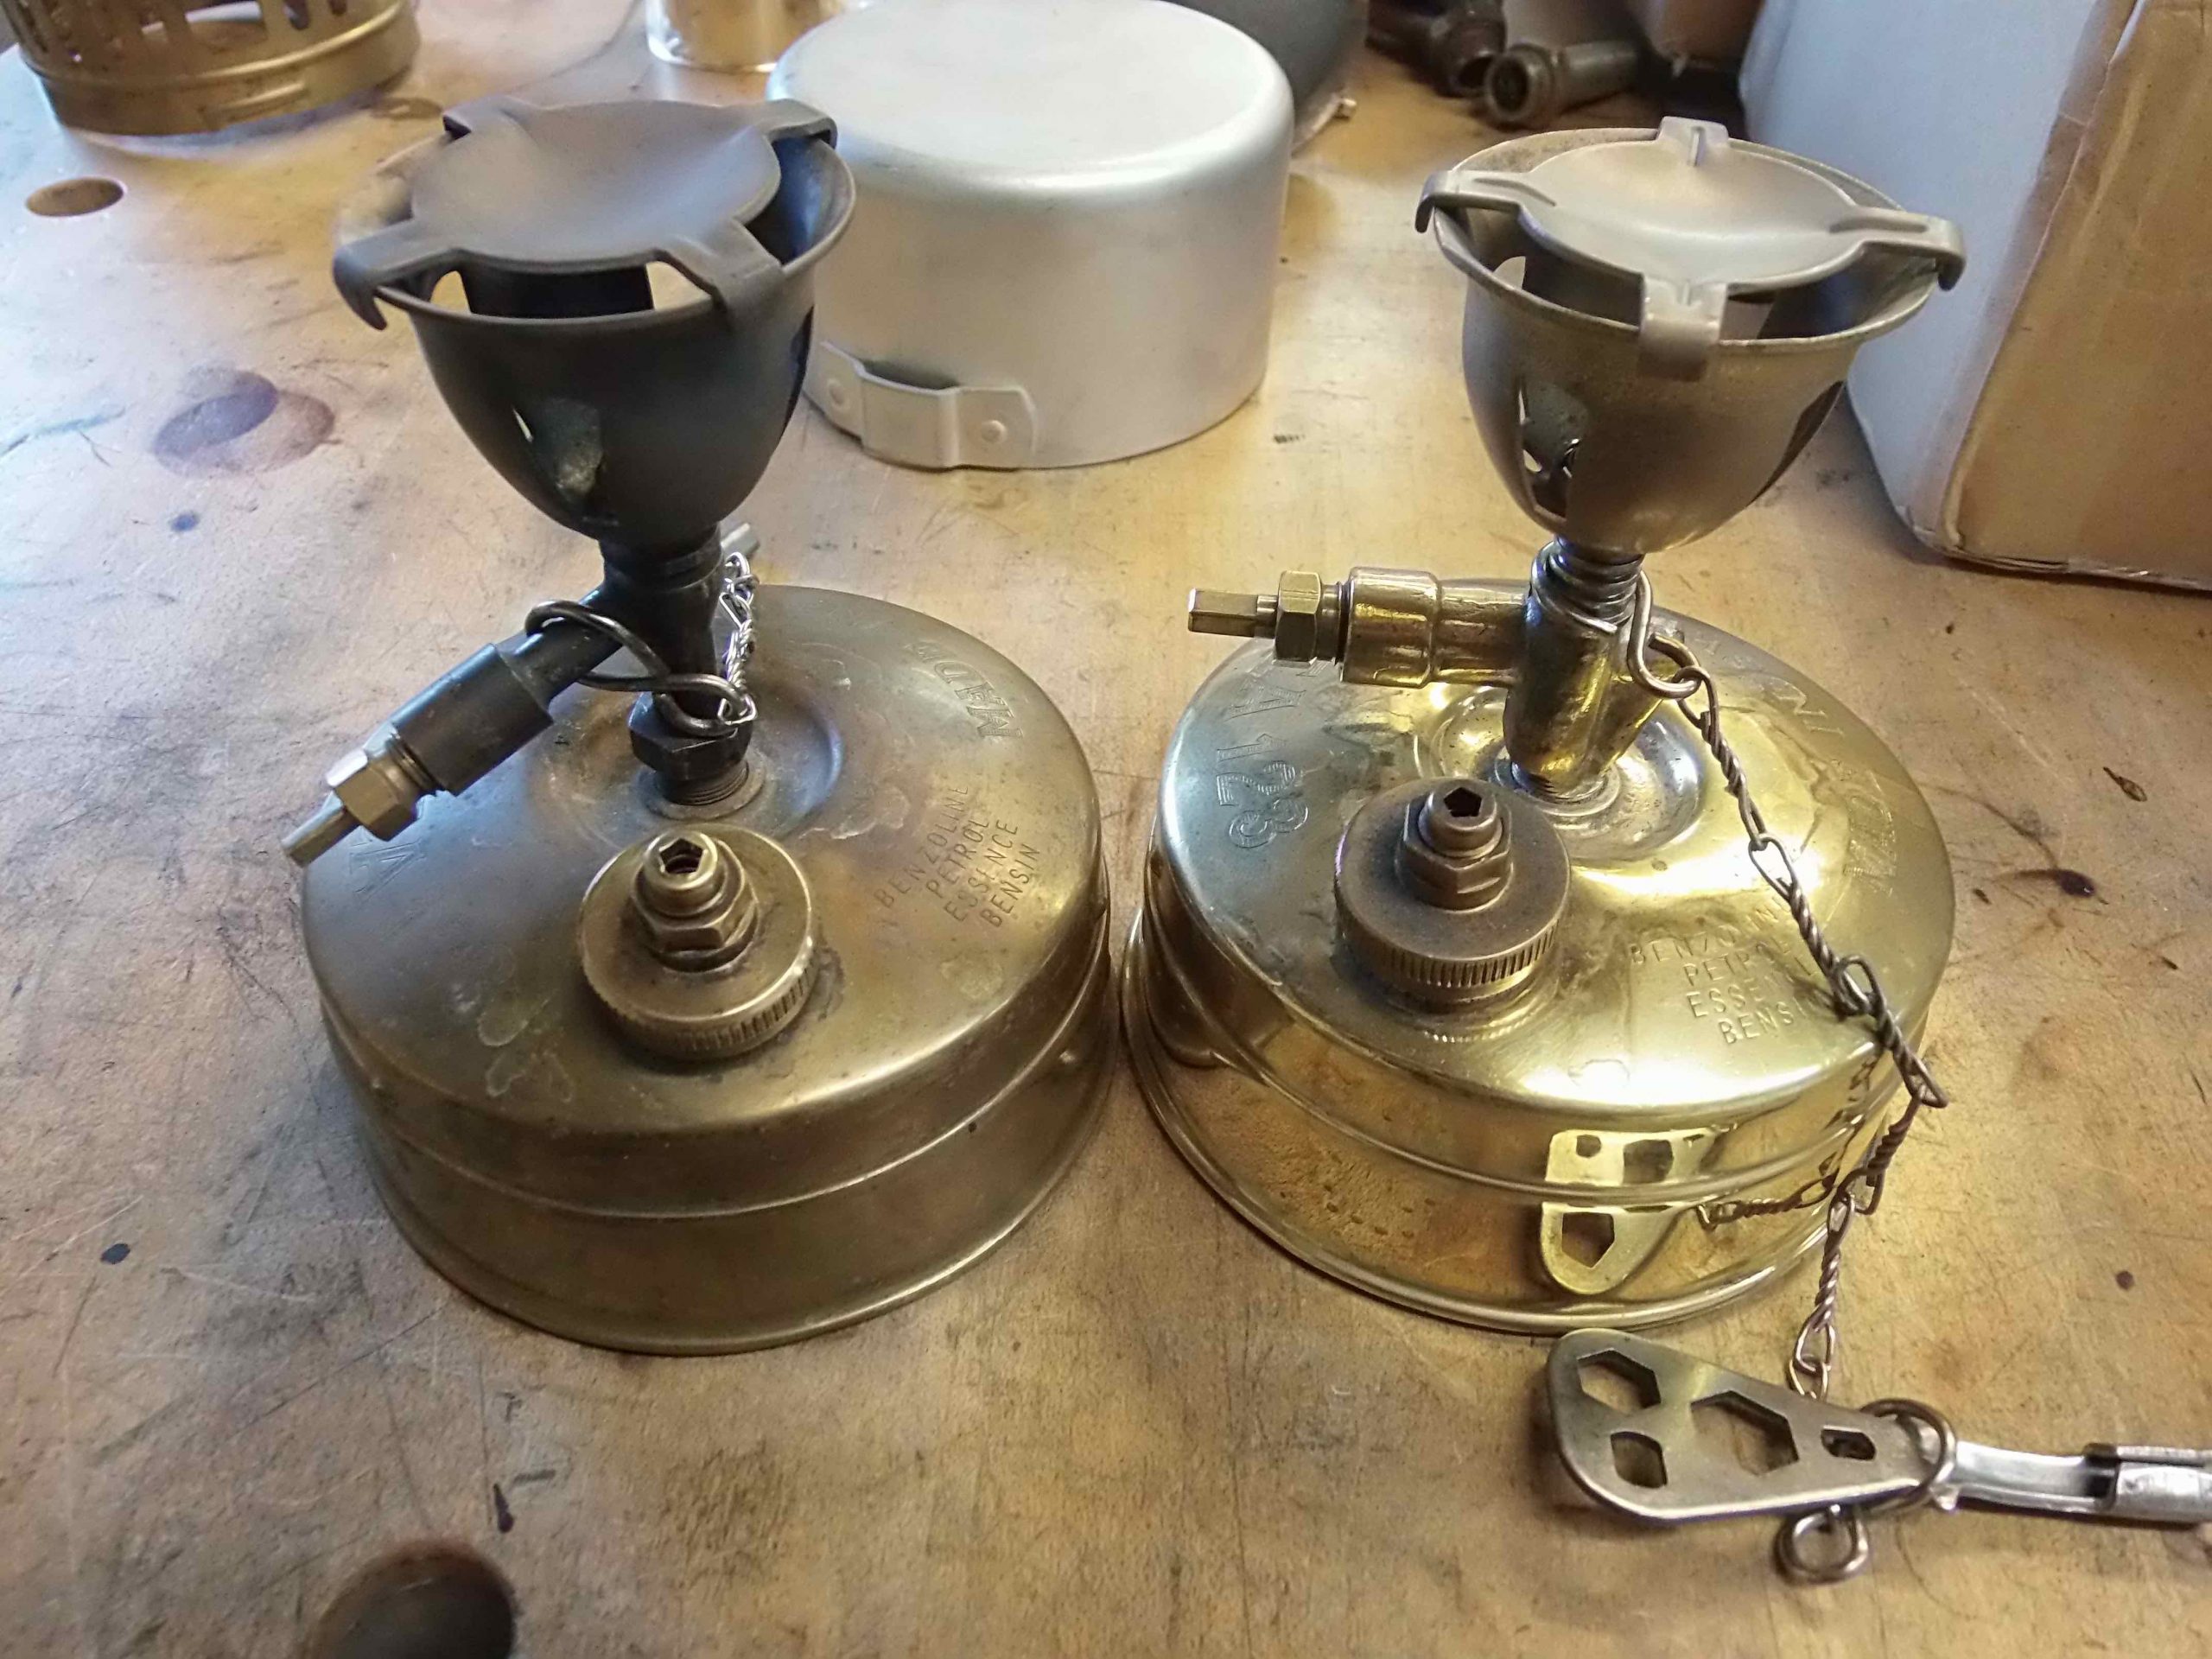
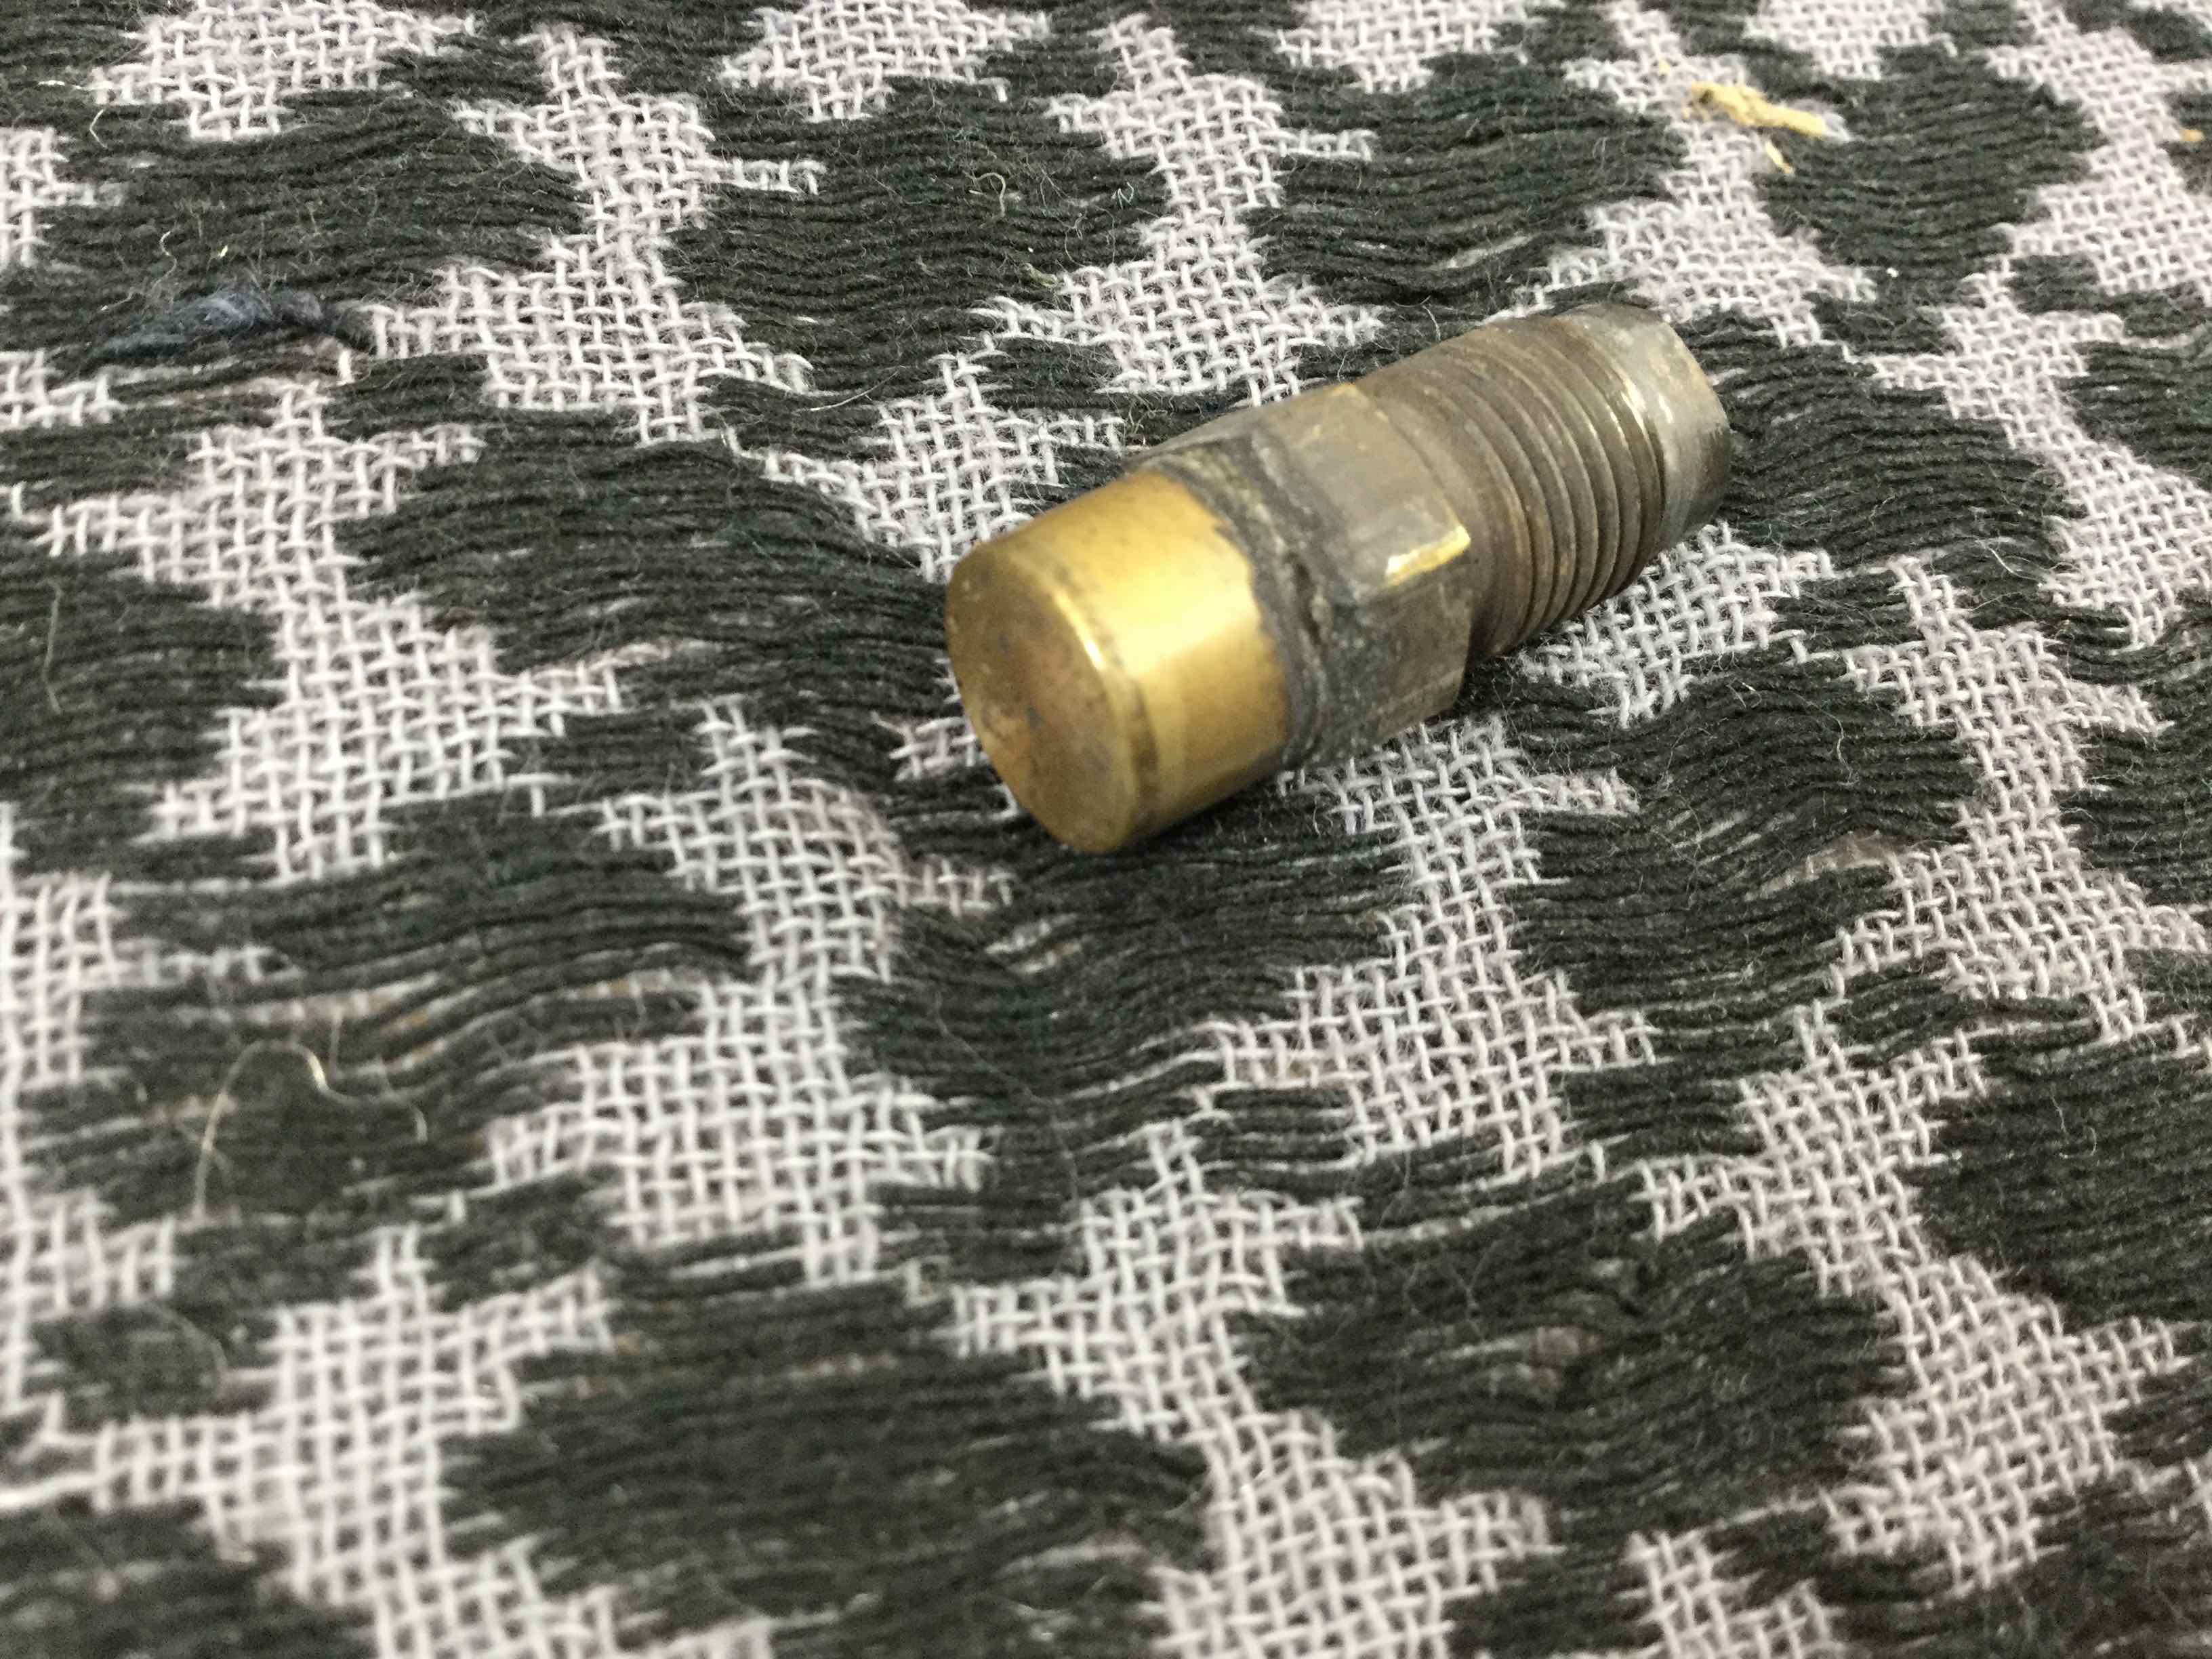
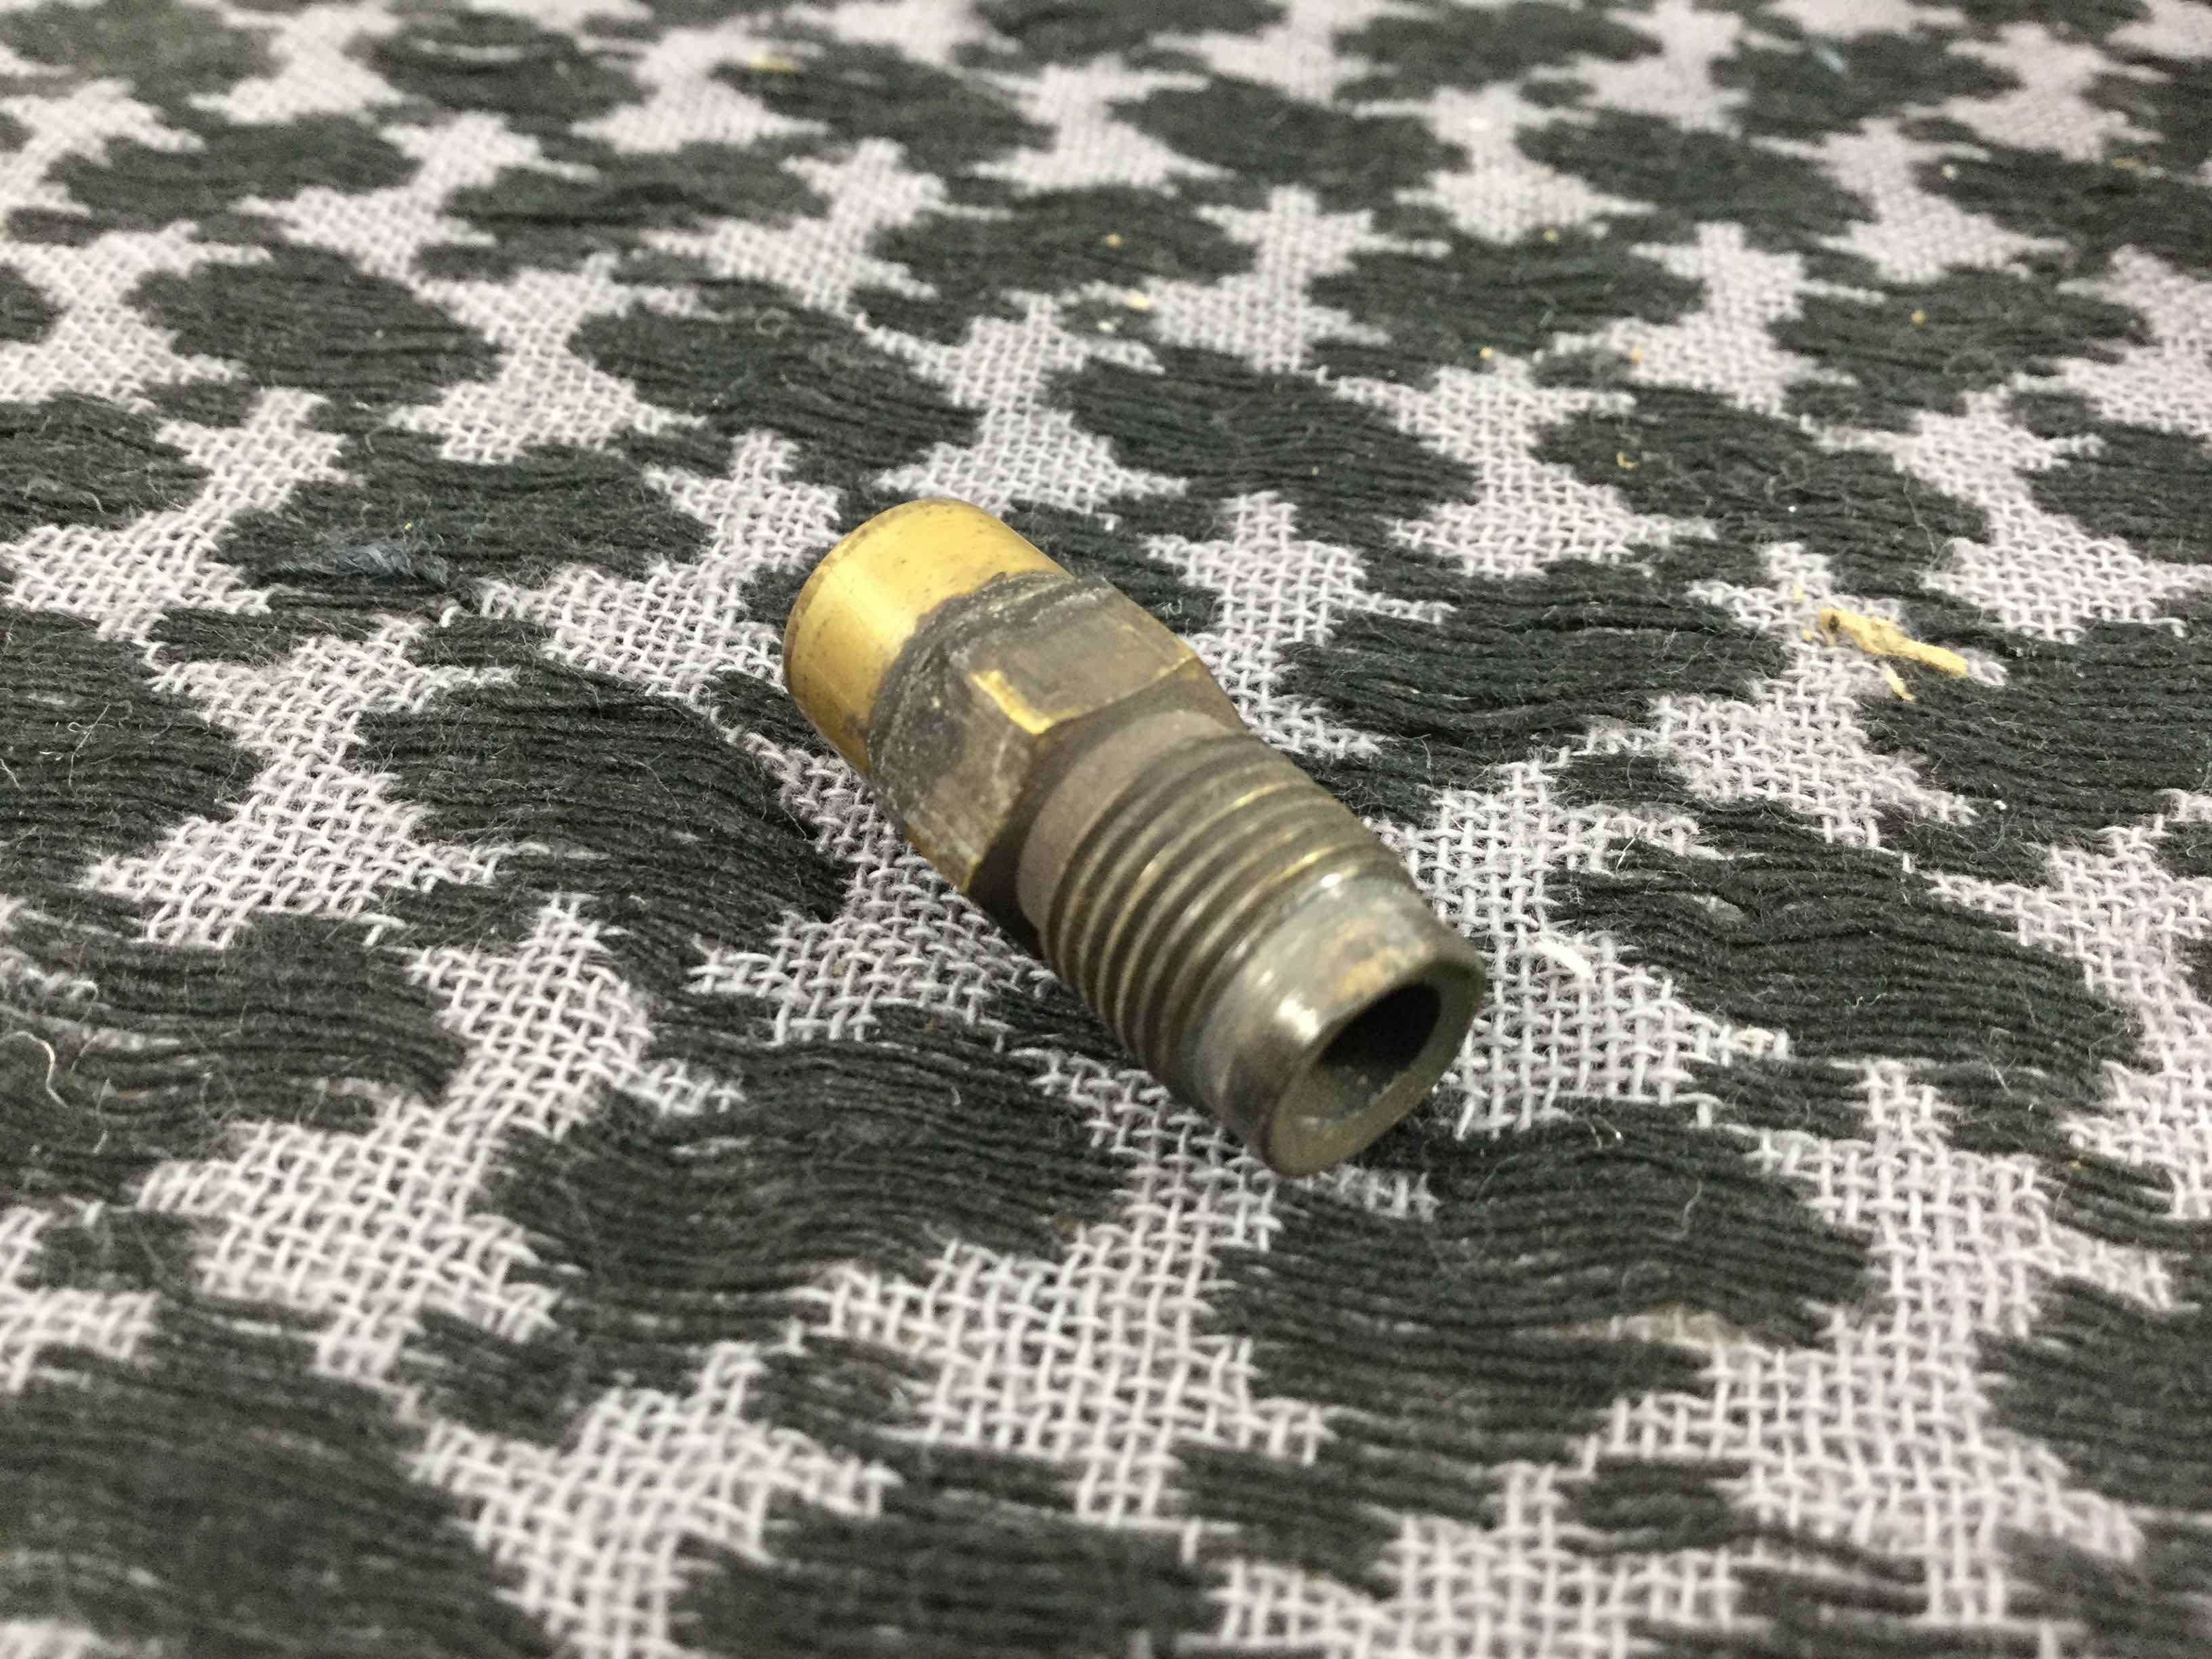
Sure. You bet. Here are some photos. All measurements in millimeters. This is a genuine Sweden-stamped and Swedish-made NRV. The dimensions are proper for the vast majority of NRVs in stoves out there. Be aware there are a few stove companies that vary from this style. Optimus, Primus, Radius, Svea/Sievert and Enders all use this style of NRV.
P2070106.jpgP2070108_2.jpg
Length
P2070110_2.jpg
Width
P2070112_2.jpgP2070113_2.jpg
Depth
P2070114_2.jpg
Head diameter (just for interest)
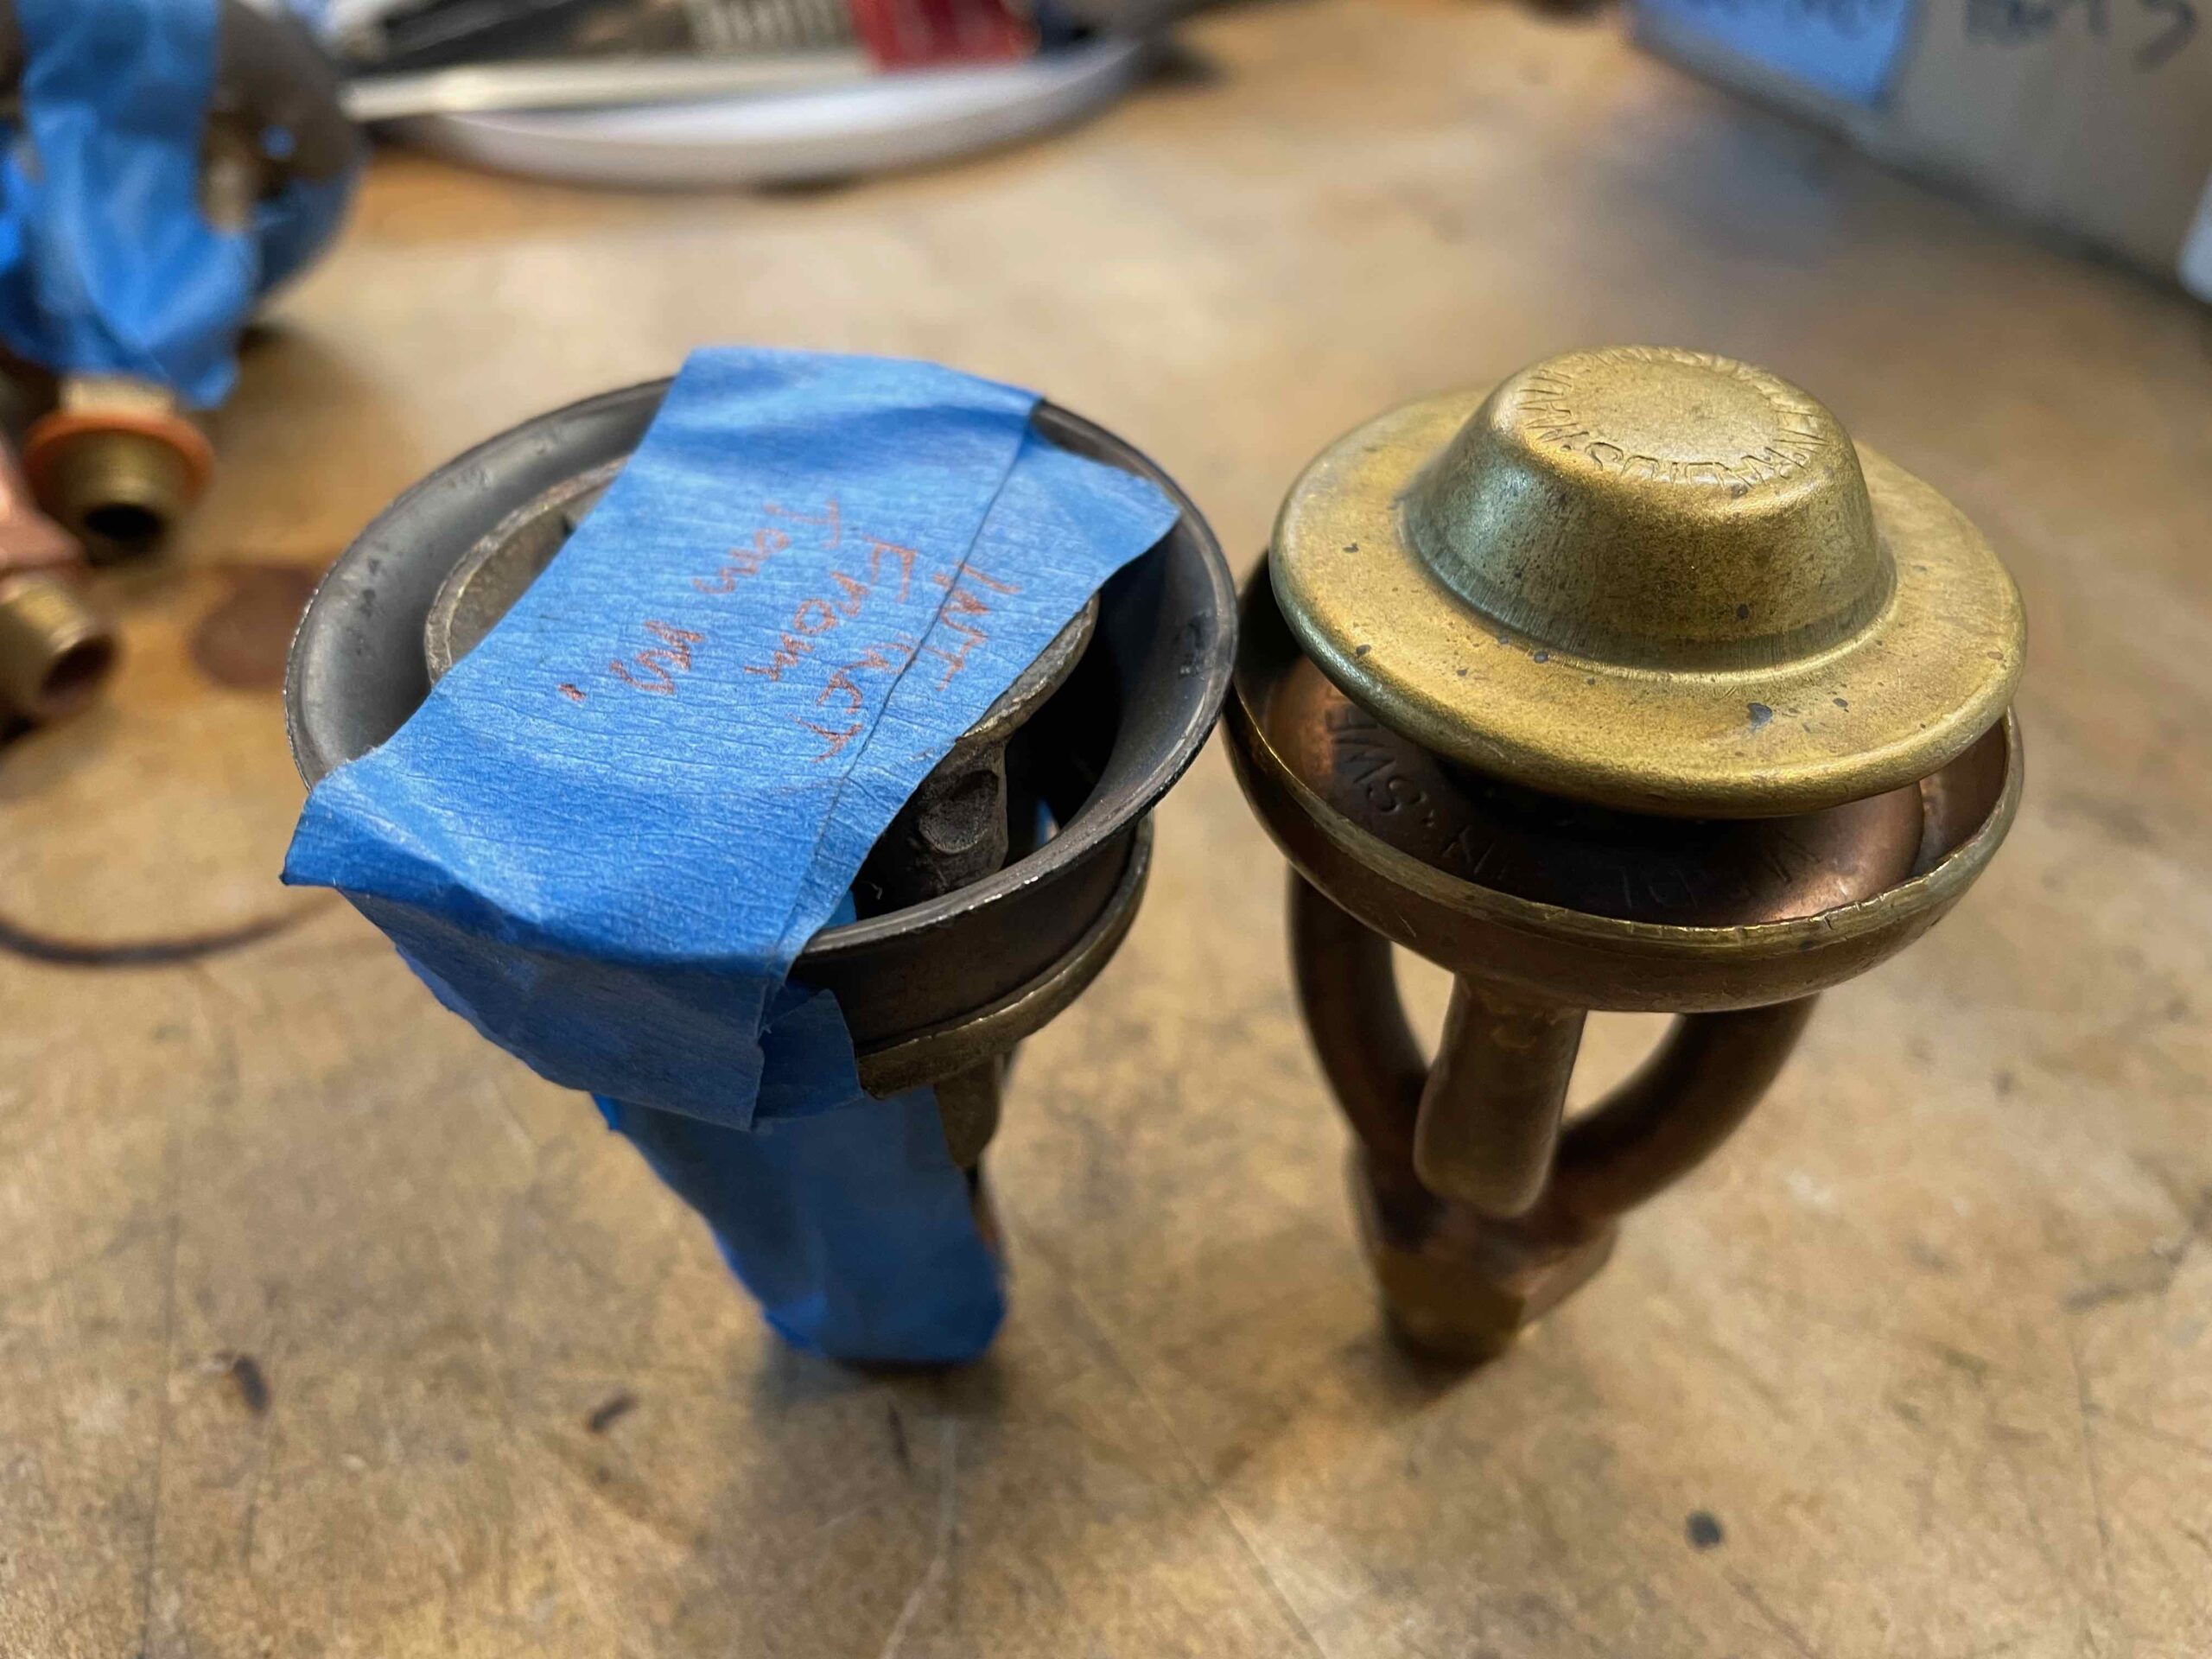
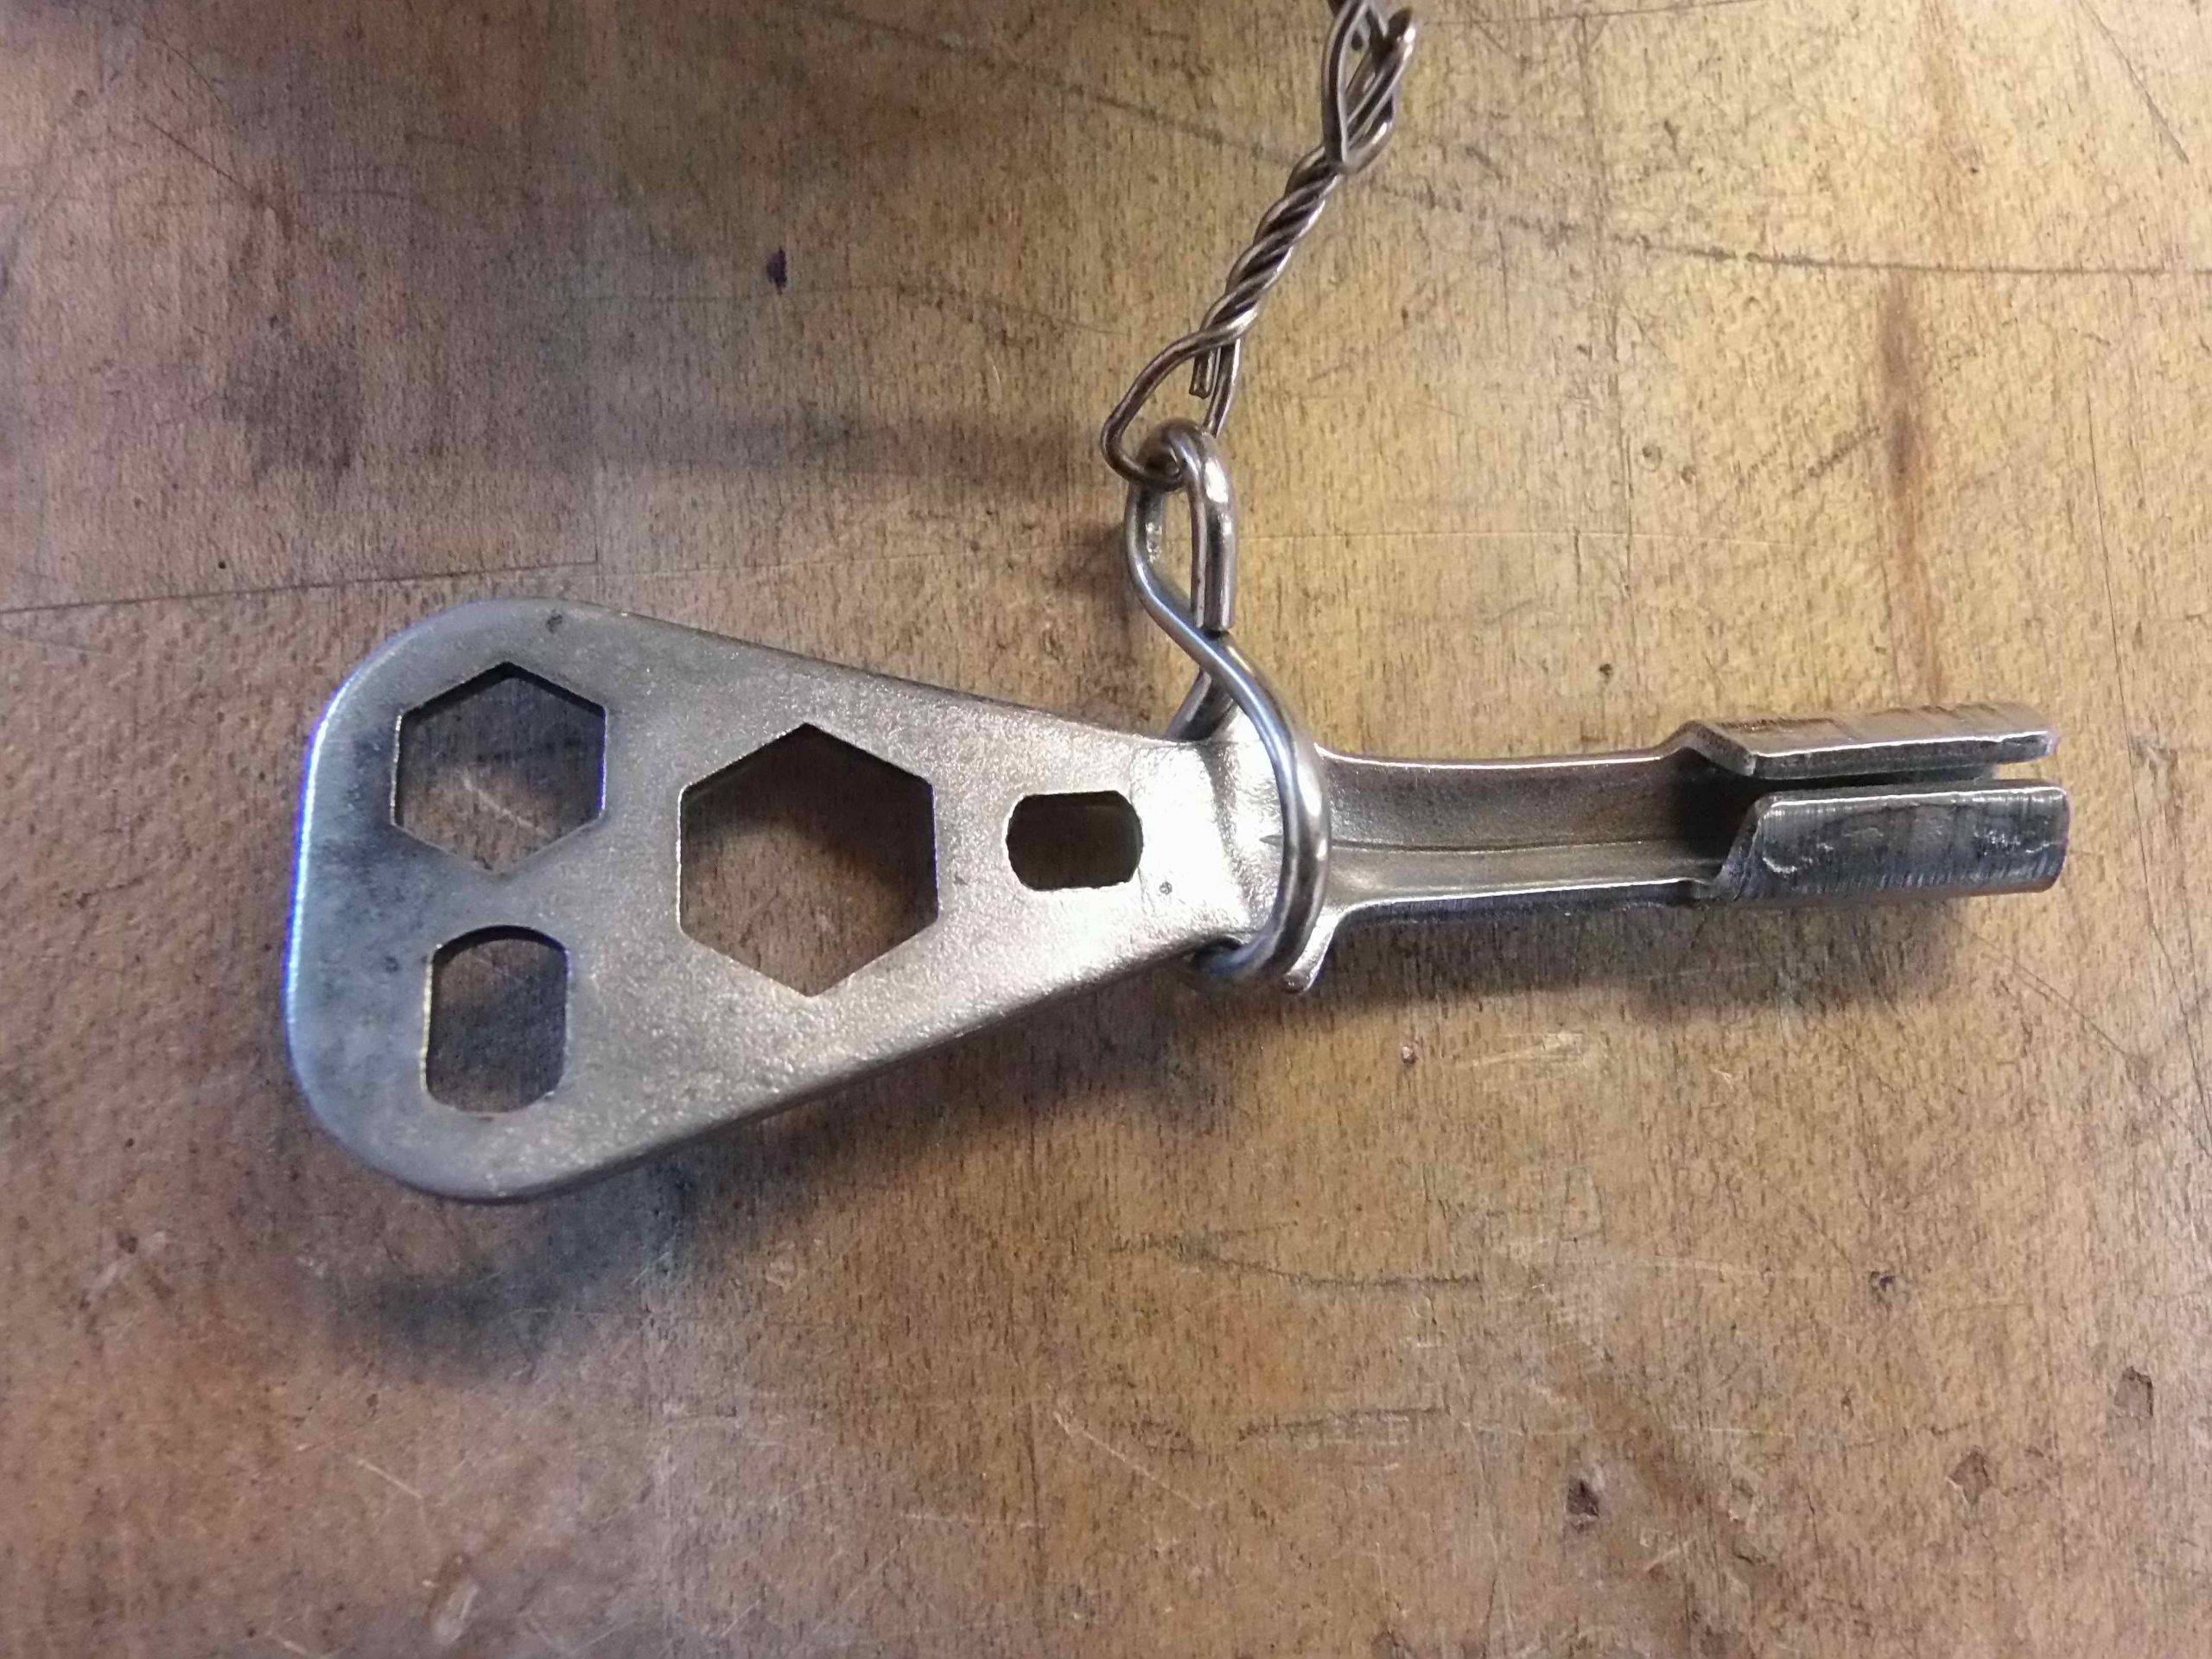
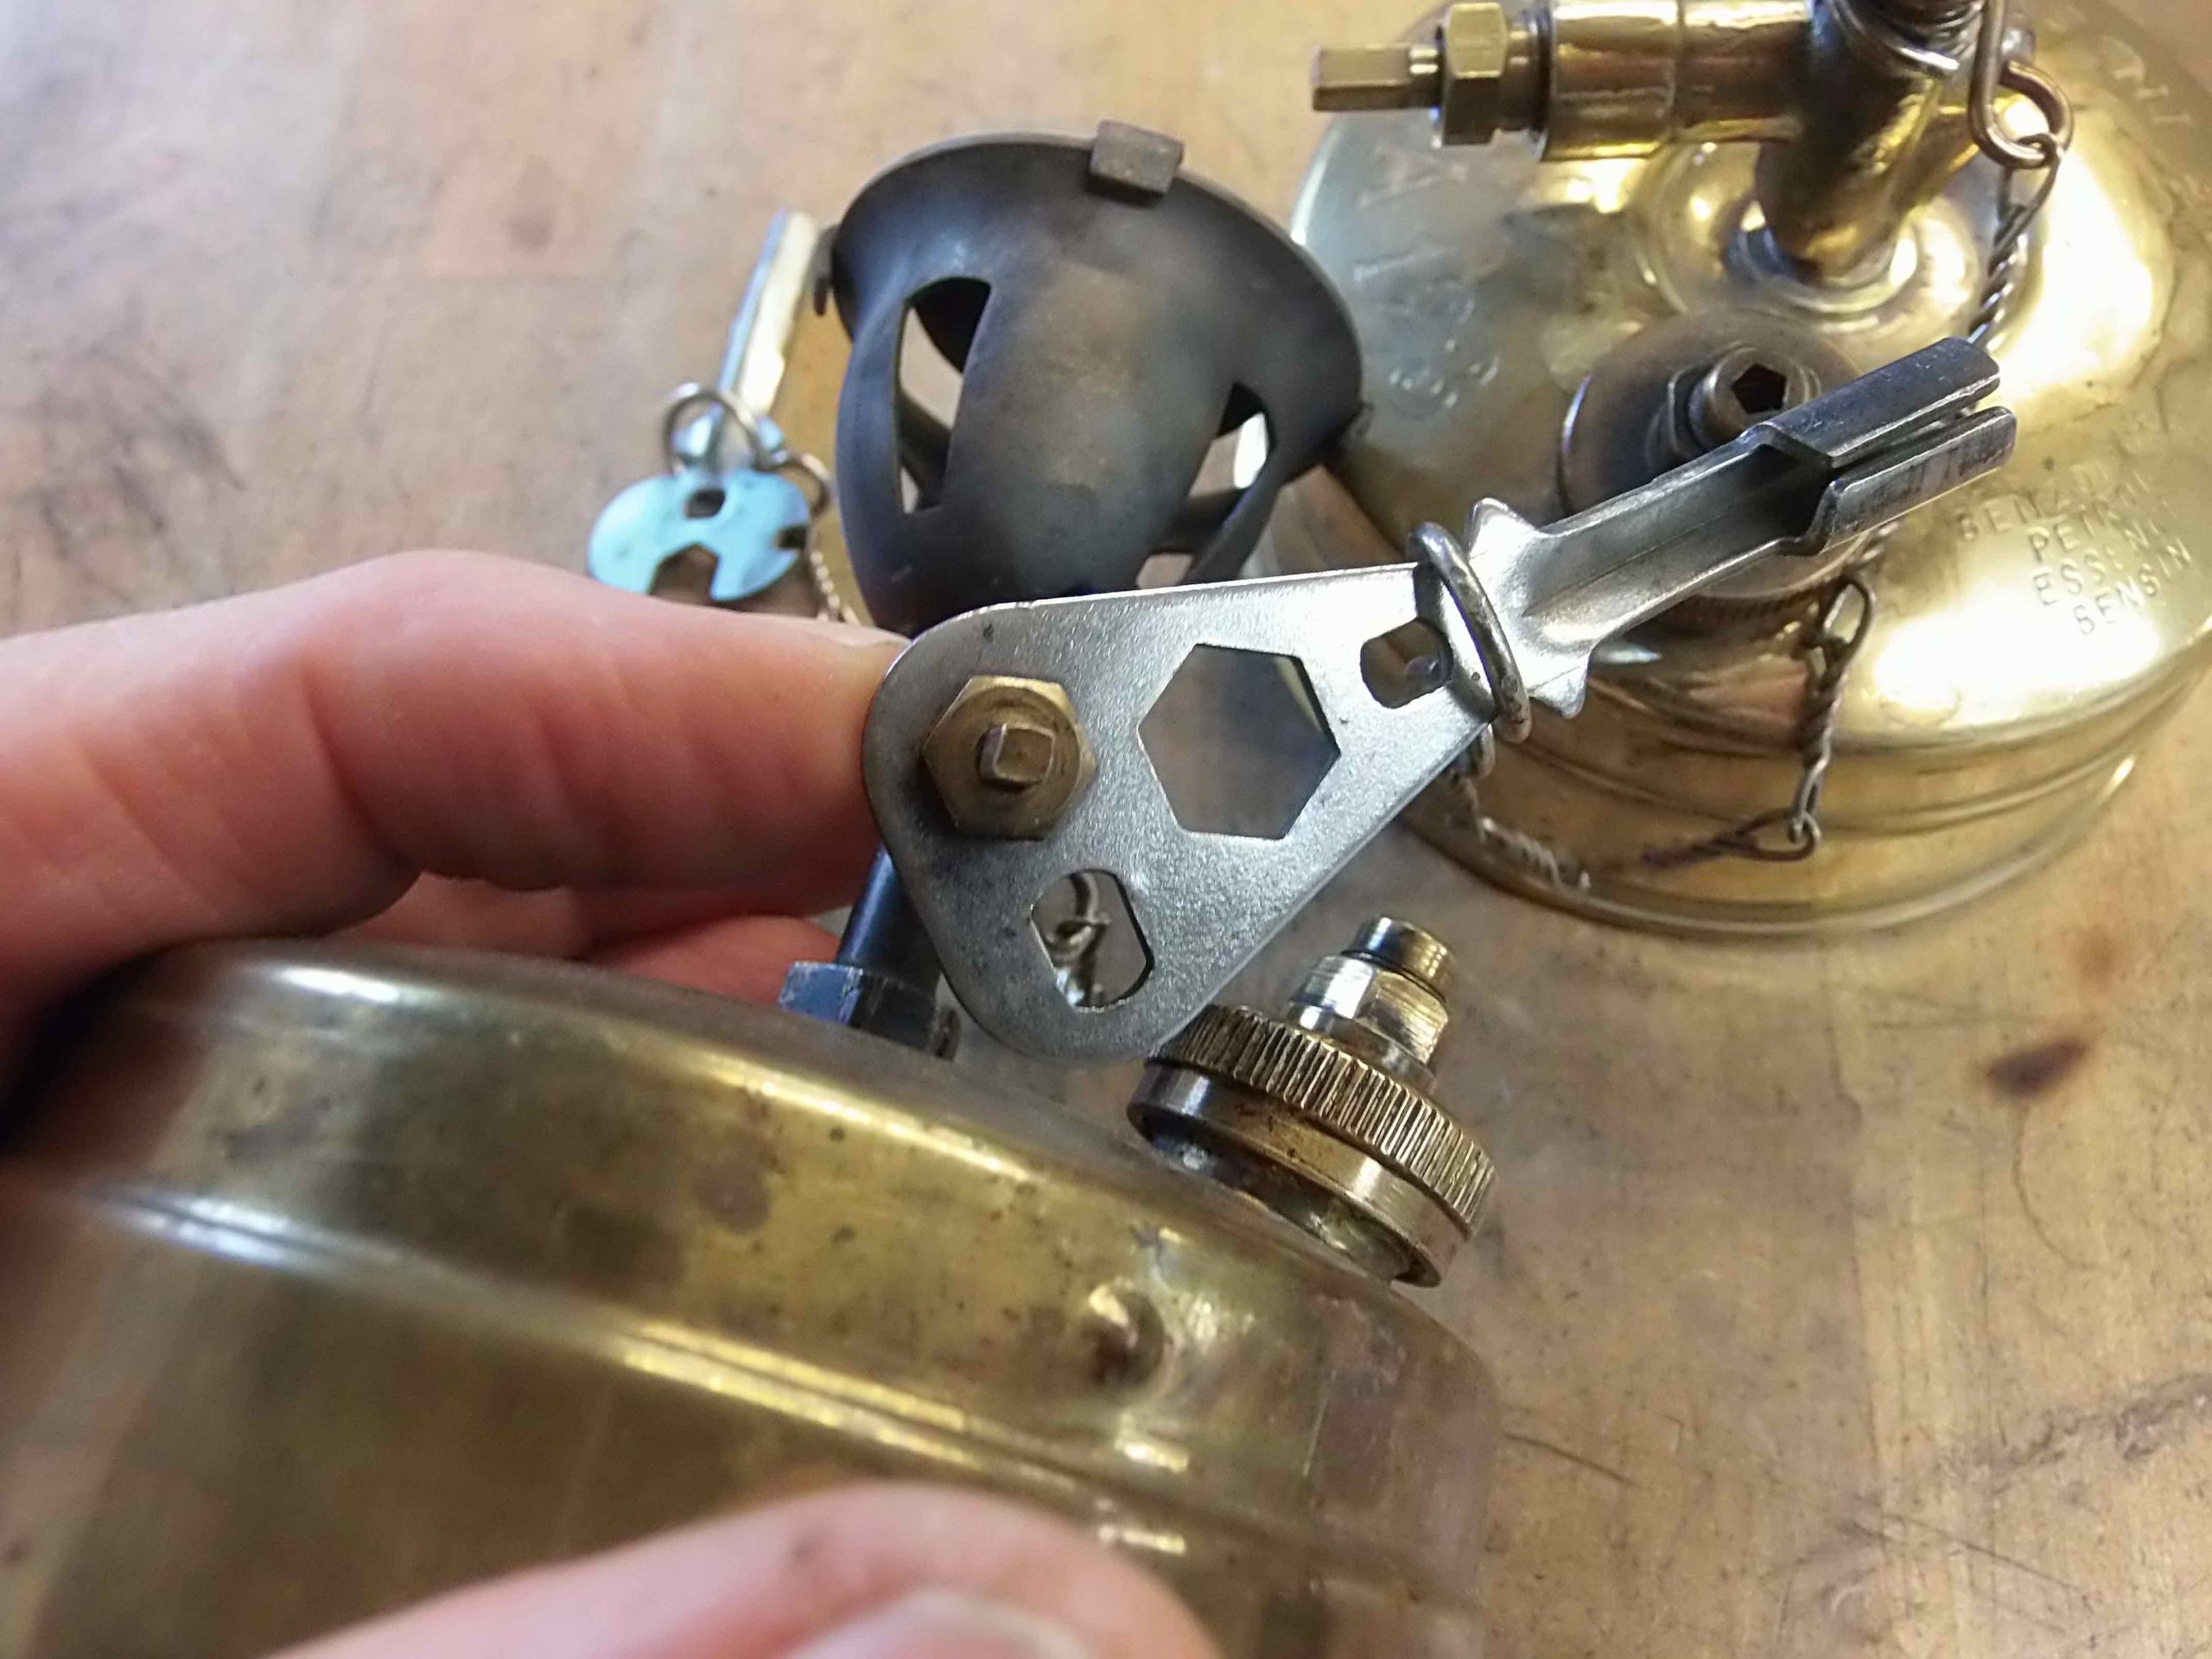
Iif you are a home hobby sort, it’s probably easiest to take a steel bolt just under the inside diameter of your pump tube, cut off the threads with a hacksaw, and then cut a slot just slightly undersized in the end of the cut-off bolt with the hacksaw. Clean the cut to exact dimensions with a file. The end will look like the end of this more polished out-of-production NRV wrench made by now-retired and out-of-sight tool maker Stu Burgess in England: (In other words, you can’t get these any more.)
P2070115_2.jpgP2070117_2.jpg
If you are more of a machinist, maybe have a vertical mill, you can use a 4mm end mill with two passes in your mill and make a closed end wrench like this:
P2070118_2.jpgP2070120_2.jpg
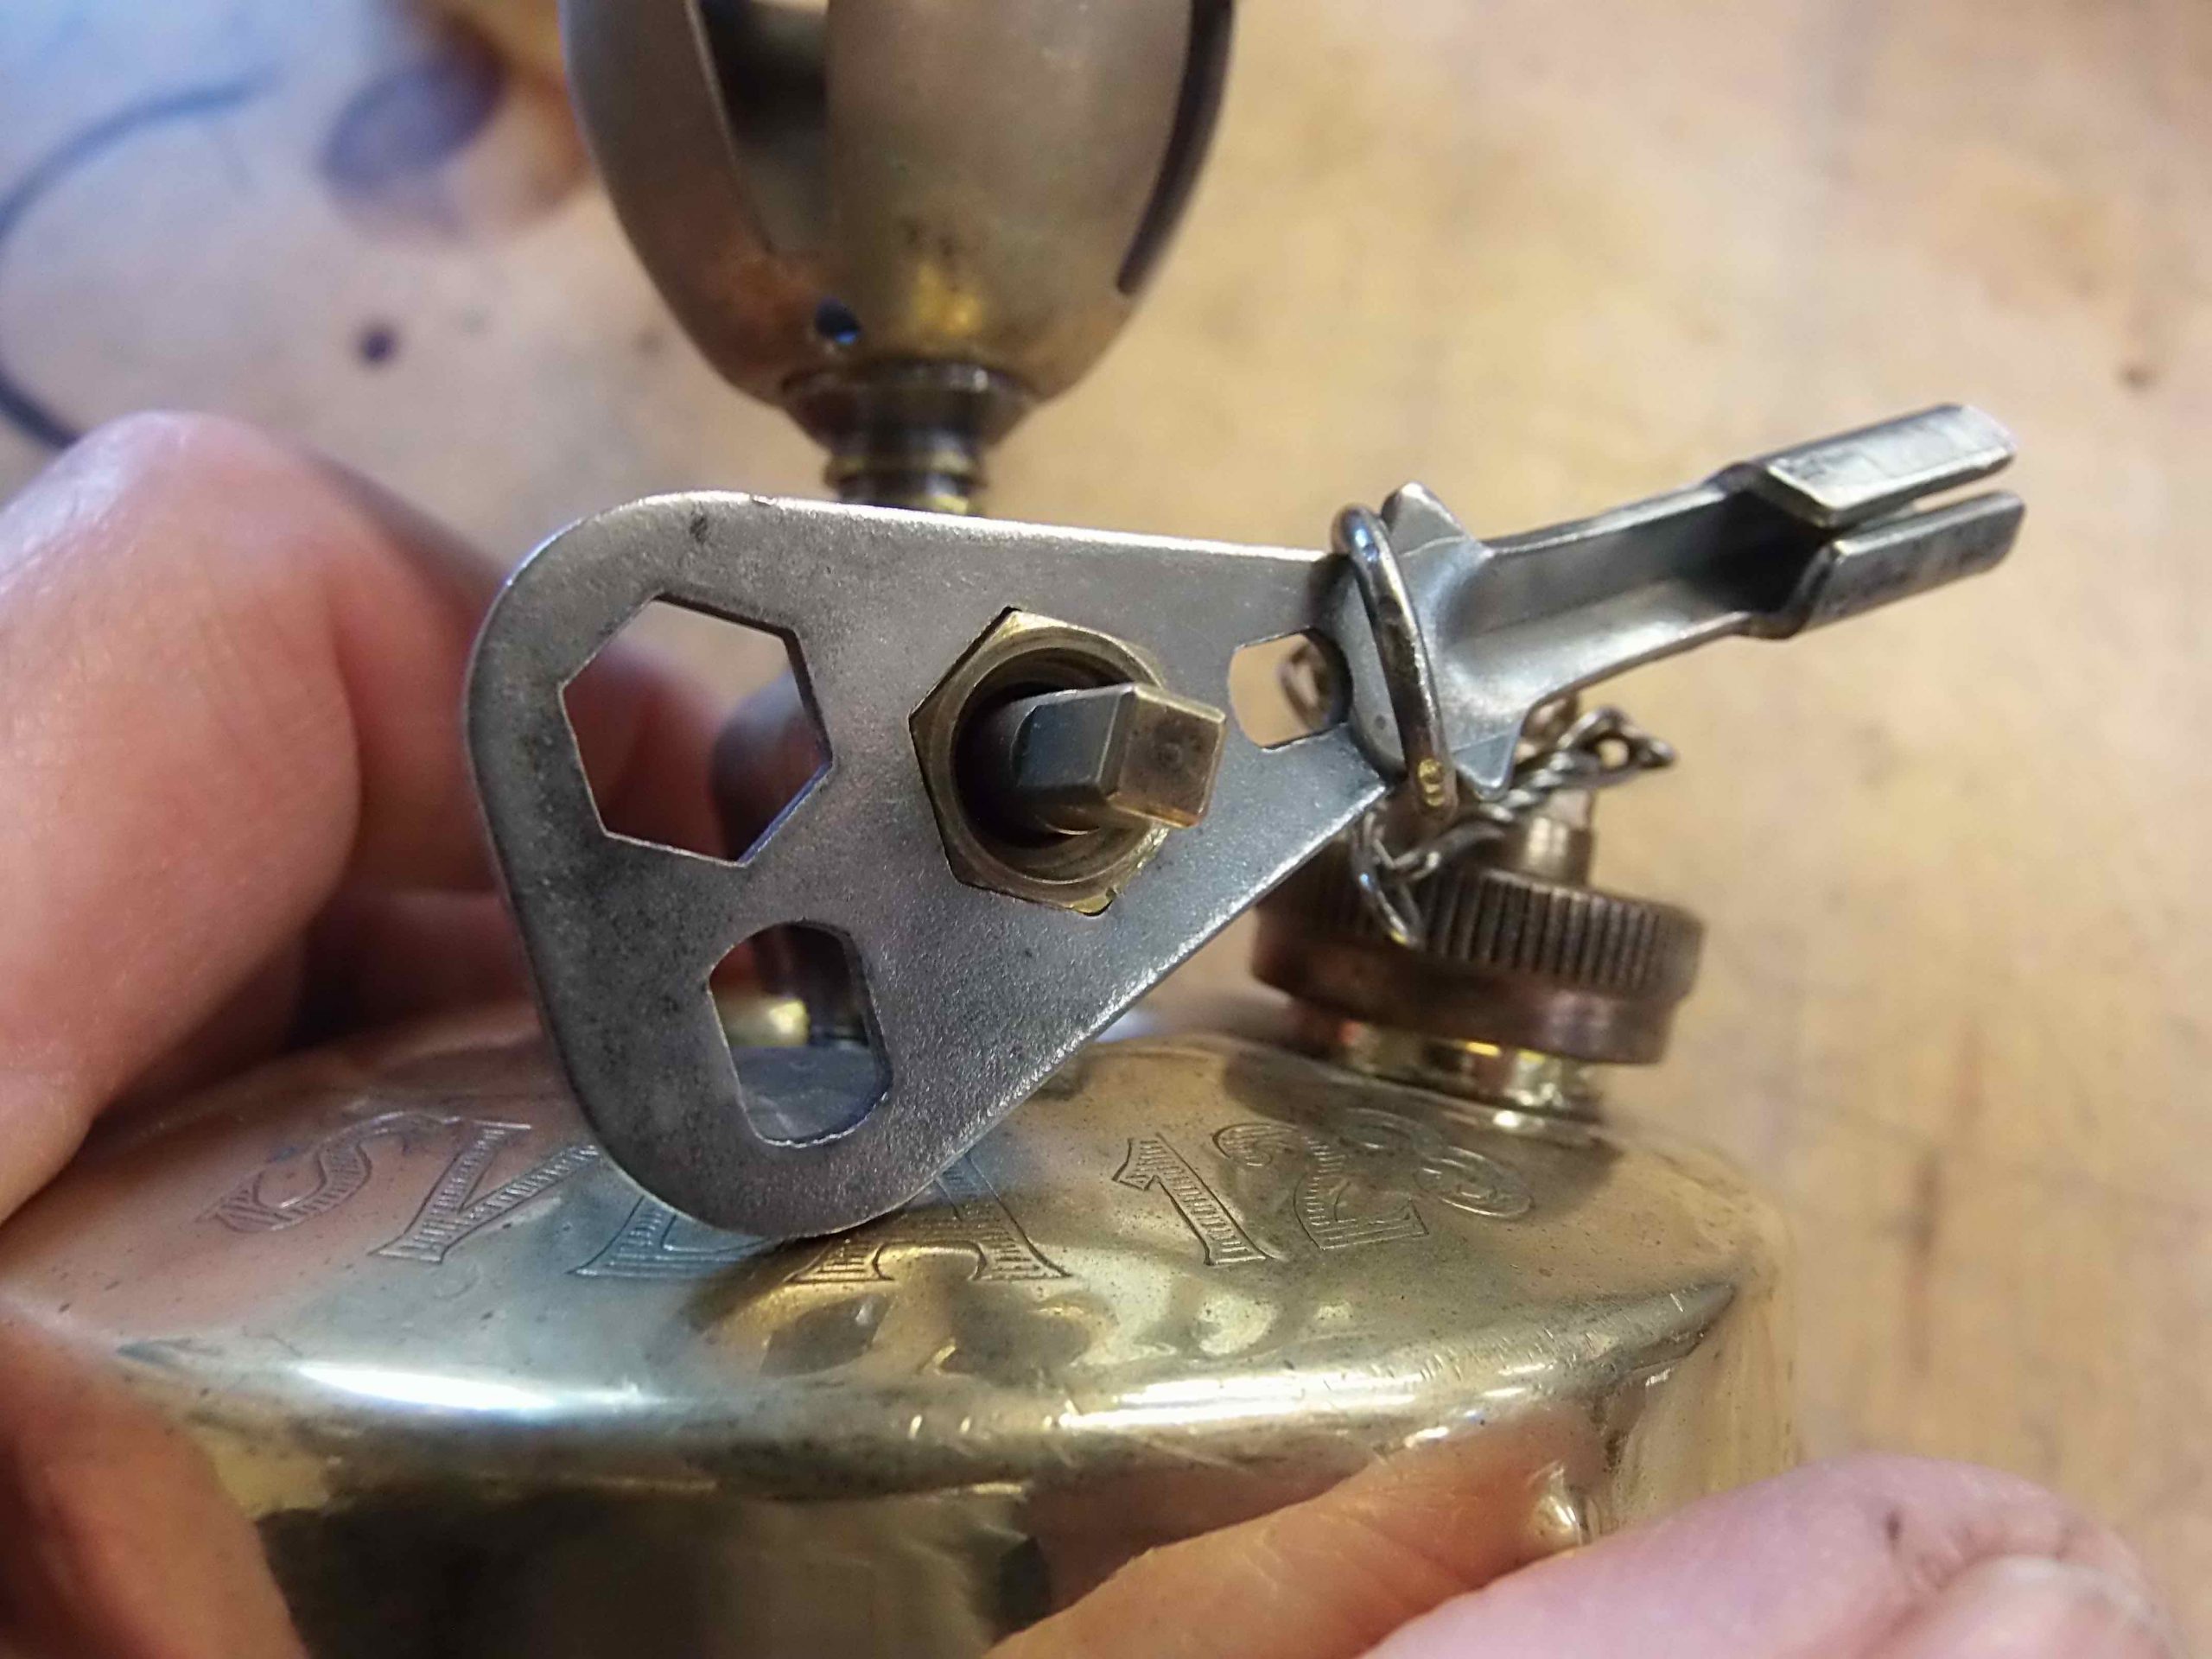
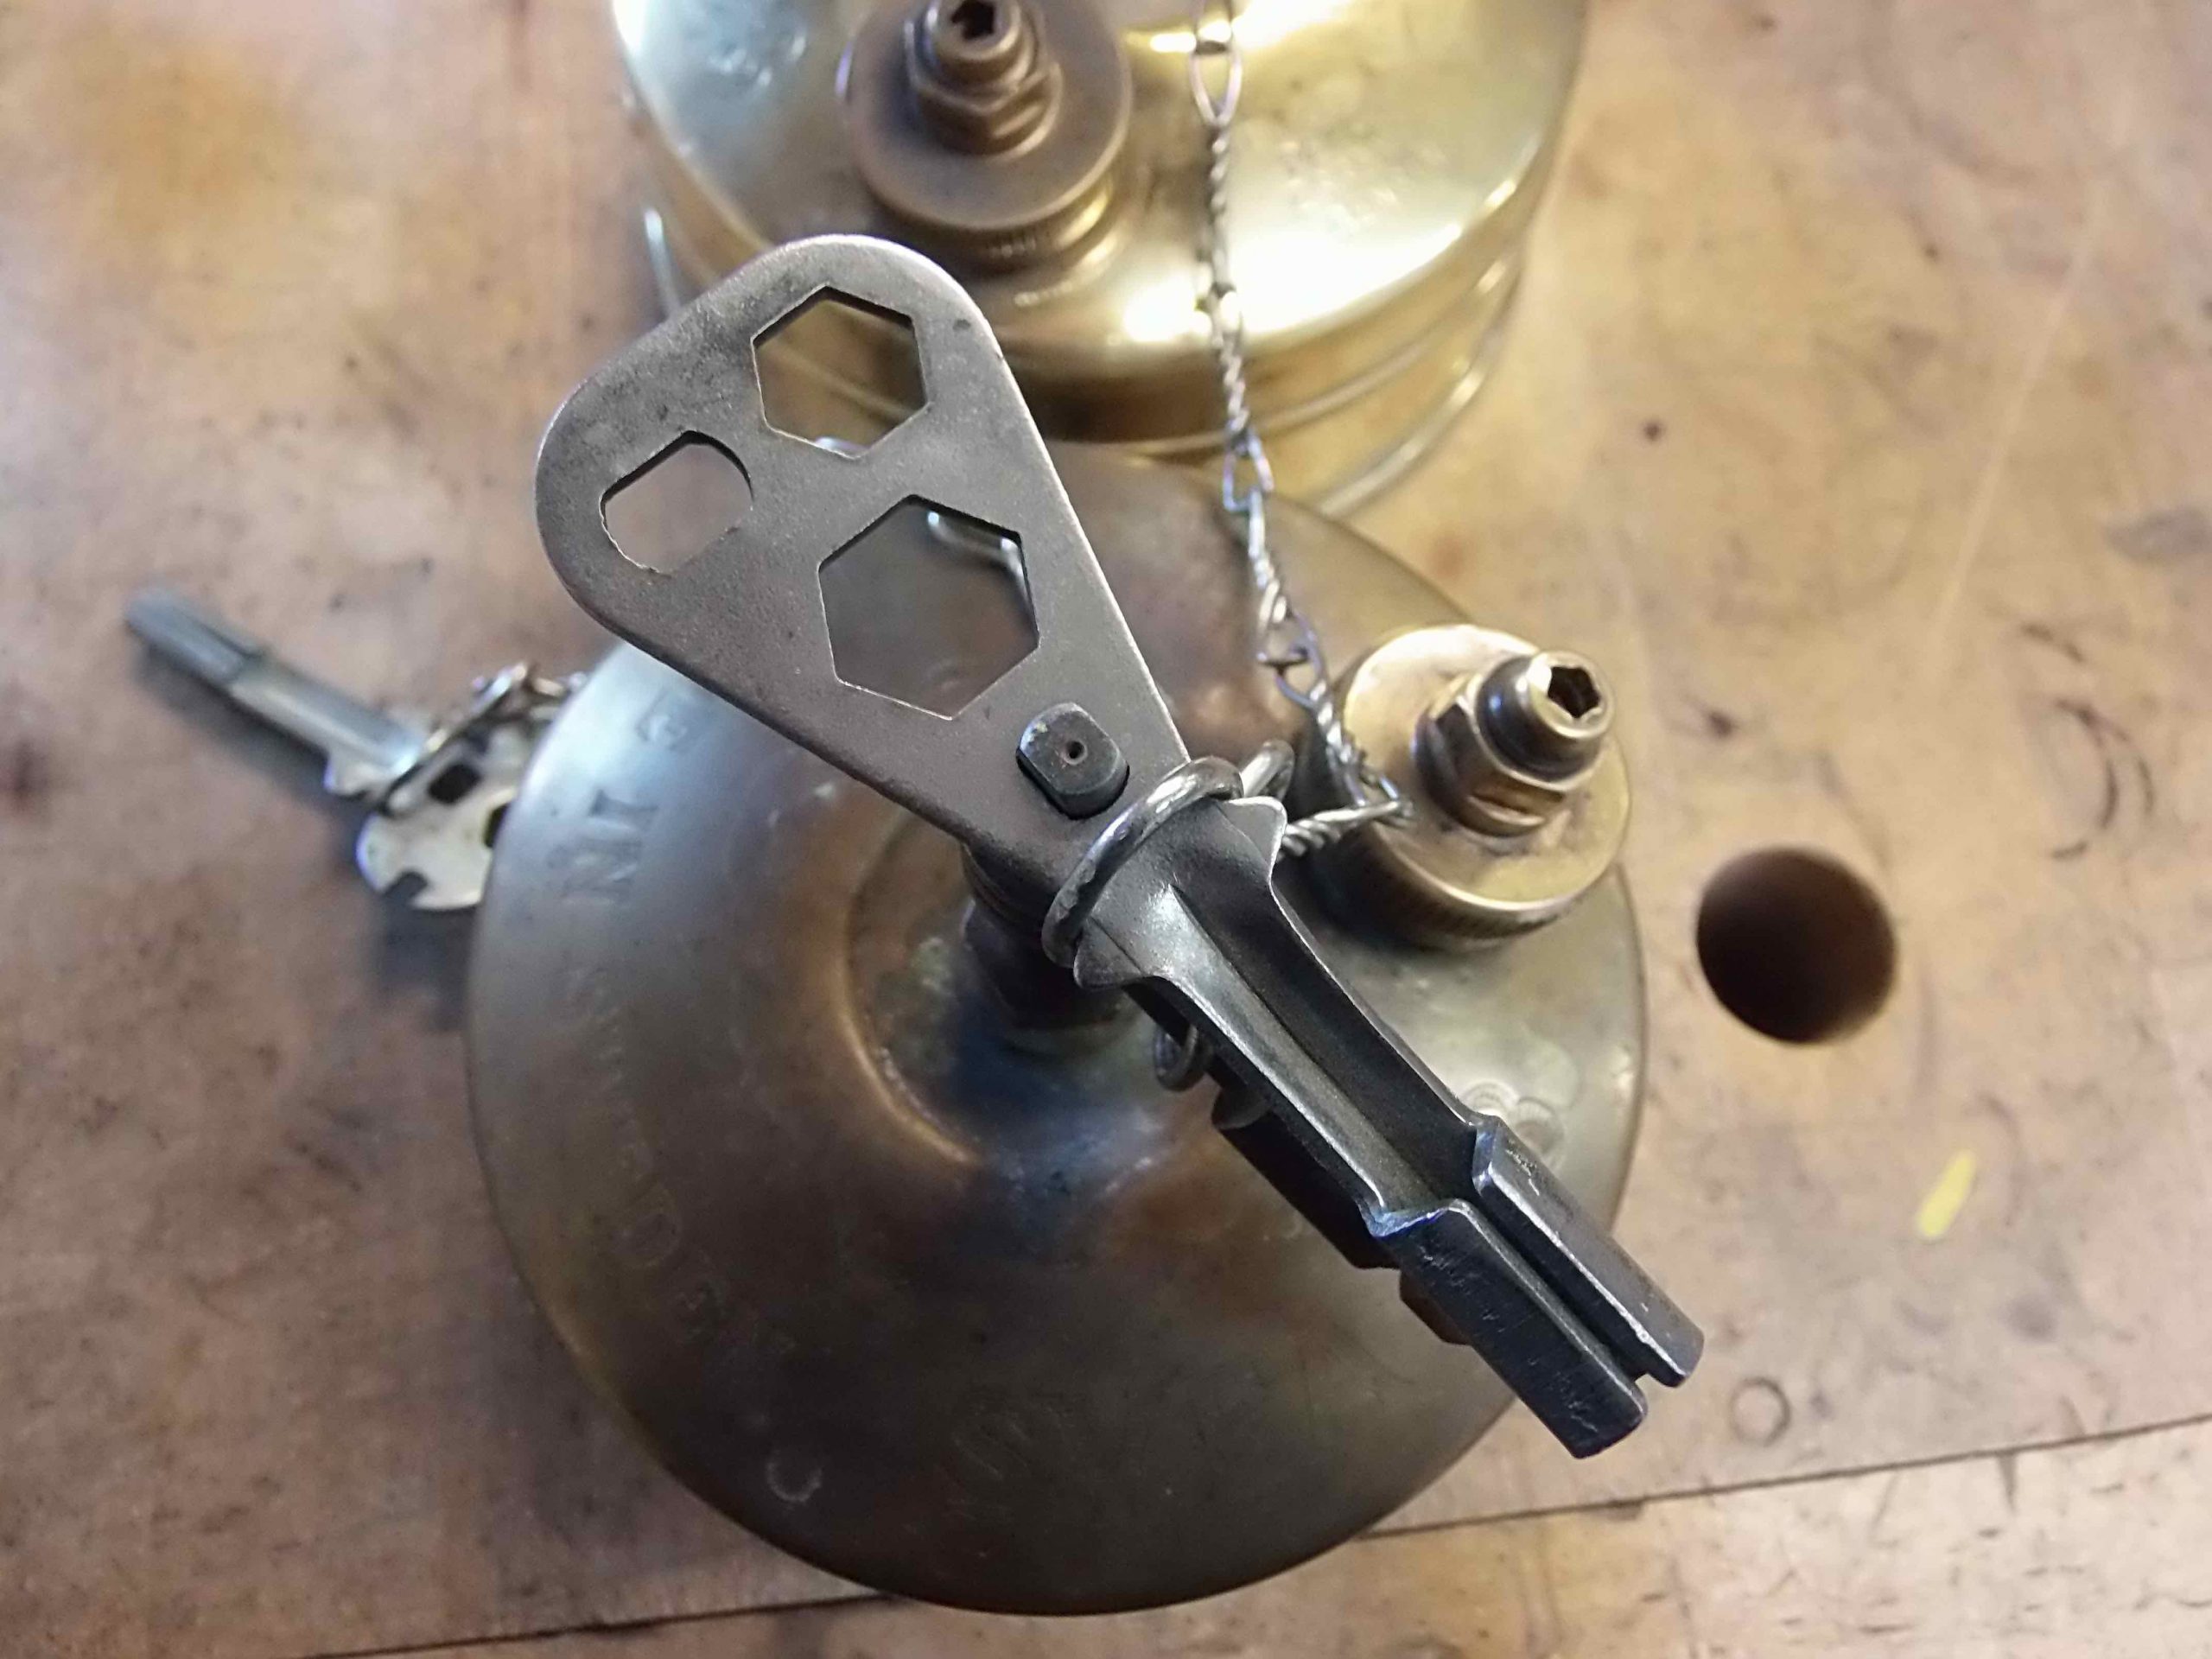
The closed-end wrench just above is an original Optimus wrench for marine stoves. The advantage of the closed end wrench is that it won’t do this in use:
P2070125_2.jpg
I tried to make this one up from a bolt recently to fit into a specialty off-brand stove whose NRV head is down inside a pocket in the end of the pump tube. That’s a rare stove and you don’t have that concern.
The failed example I show directly above is made from a too small diameter bolt. So, try to keep your bolt as large in diameter as you can to avoid the sides bending out like this. More material gives better support.
Lastly… here are some unsolicited pointers:
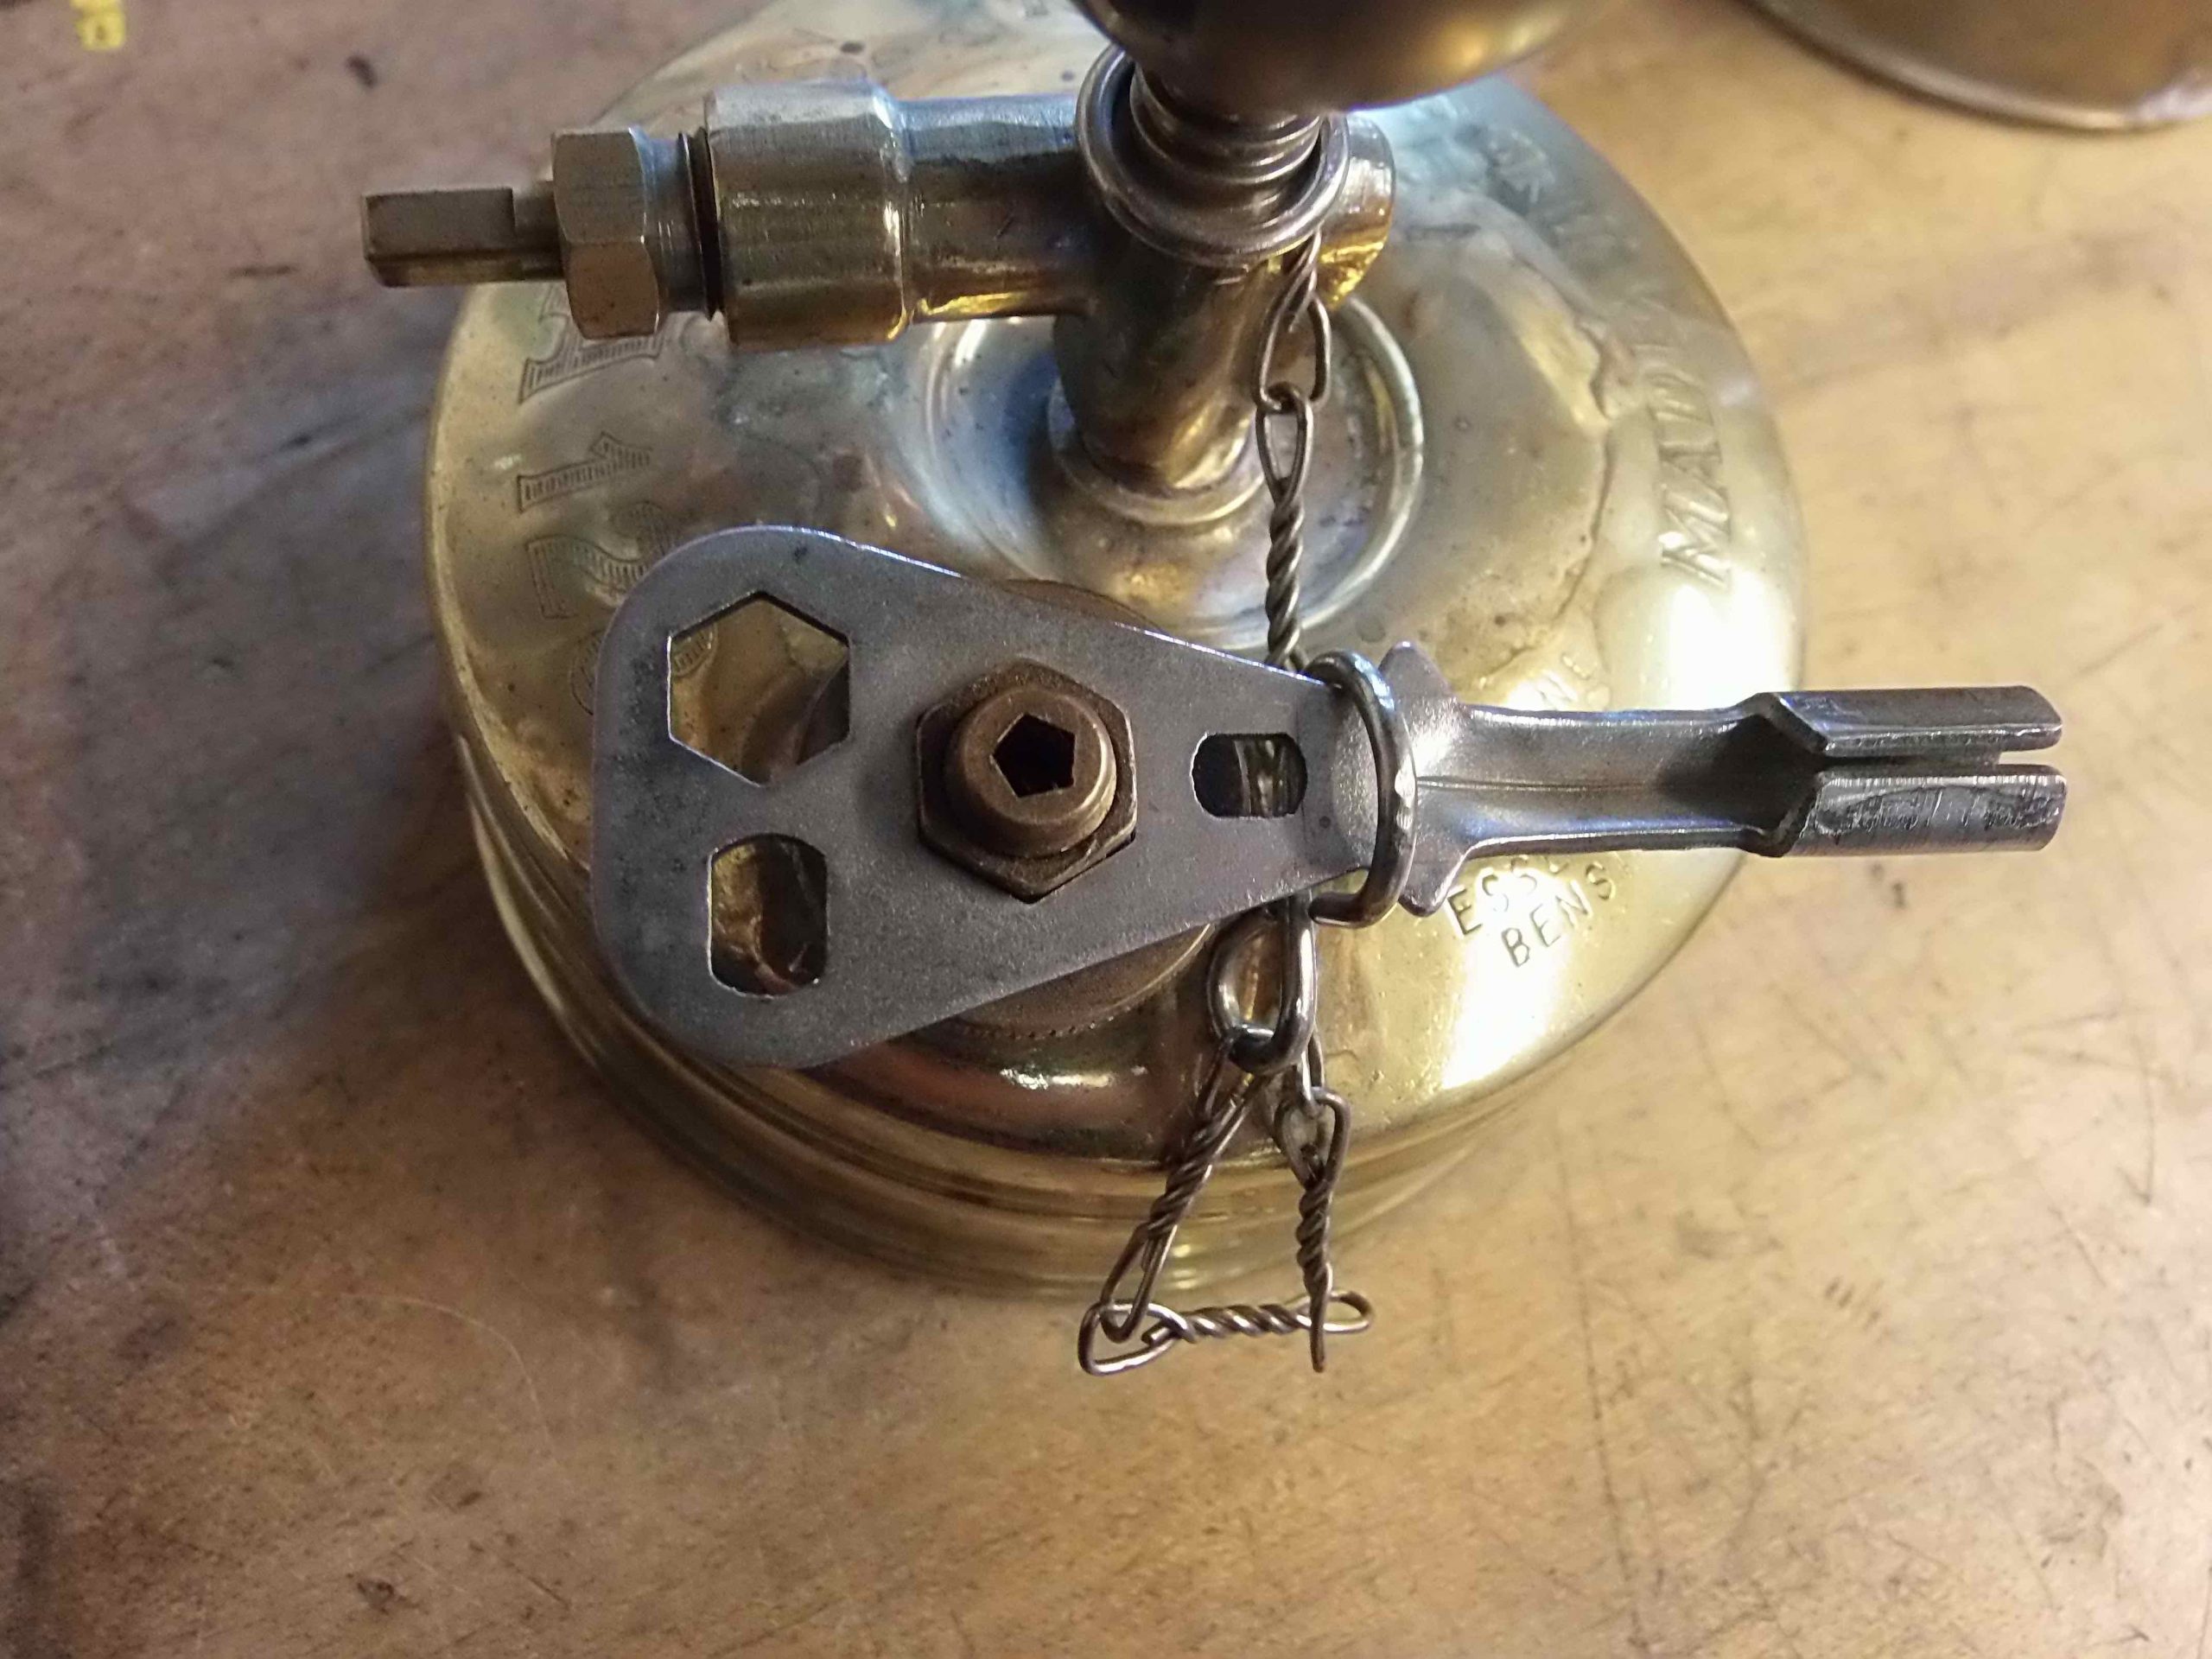
  1.  – the best way I’ve found to remove NRVs is to put the wrench upright in a vise, put the stove over the wrench, then use strong downward force on the tank to keep the wrench head on the NRV head so it doesn’t skip off the end of the wrench. I demonstrate the technique in this section of one of my YouTube videos: https://youtu.be/2LKsxIYCTko?t=226
  2.  – tighten the NRV just slightly/gently before trying to untighten. This may help to break the brass-to-brass bond if there is no NRV head washer present
  3.  – if you chose to use penetrants… it will do no good at all to put the penetrating oils down the pump tube. The NRV is air and liquid tight sealed inside that pump tube. Instead, use a small brush and reach inside the tank through the fuel filler to apply penetrant to the outsides of the pump tube where it will run down the tube and get into the exposed threads of the NRV that are hanging out at the end of the threaded pump tube end block. That is where you want penetrating oils to assist.
Hope that helps. Good luck!
BD

Heat & Air Clean Regulated Burners?

Hi BD
Is it possible to “heat and air clean” the carbon and other crud from a regulated burner using compressed air and a torch?
Thanks!
Burner Guy

Hi Burner Guy
Thanks for your question! Yes! Absolutely, you can clean regulated burners using the manufacturer approved heat and air cleaning method. Like all burners, you’ll want to disassemble the burner, removing the jet, the spindle and the spindle nut.
But, you’ll need to close off the spindle opening.
So how to block the opening at the spindle? What I did was take a spare spindle nut and silver braze a cap on the open end. I just used a slip of brass sheet over the open end and machined it round after the brazing. But, you could leave it rough and all and it would still do the job. 

Once threaded into the spindle housing, the modified spindle nut will direct the air through all parts of the burner and out the jet.

Hope this helps!

(PS – Before anyone asks… yes, this is a very odd burner and is somewhat rare. It was close to hand from a long-term stove project I’m working on. So, yeah, it looks a little different from your everyday standard regulated but the idea is still the same.)
BD

Which Cap for a “Multifuel”?

Hi BernieDawg
I  have  a  short  question  about  the  bernie dawg silencer caps. Does the Omnifuel Cap fit to the Multifuel Burner?
Best regards,
Stove Guy
Hi Stove Guy
Thanks for your questions.
I’m not sure from your question which “Multifuel burner” you are meaning. Primus has made several different stoves they have called the “Multifuel”.  And, Trangia has sold two different types of “Multifuel”-named burners. All this makes things confusing if you don’t go by model numbers or full product names.
Sooo… I’ll cover them all. Sometimes “short questions” need long answers. Sorry about that. This is a bit complicated, so please read through this carefully.
Omnifuel 3289
The OmniDawg cap is for the Primus Omnifuel 3289 stove.

Omnifuel 3289

Trangia X2 Multifuel 750001 Burner made for Trangia by Primus – current production
The Trangia X2 Multifuel 750001 burner is made for Trangia by Primus, but it is made in a way so that it is not as powerful a burner as the Omnifuel. It looks like an Omnifuel, but it’s less powerful because of the reduced power jet supplied with the X2 for use with the preferred fuels (isobutane canisters and white gas). This is also a very expensive burner for what it is. You can usually find used or even new Omnifuel stoves for less than the cost of the greatly overpriced X2. You’ll also retain the precision control and simmering using an Omnifuel due to its spindle control (absent on the X2).

For the reduced power Trangia X2 Multifuel burner, the PolarDawg silent damper cap works best using isobutane canisters and white gas due to the smaller jet supplied for those fuels. The DragonTamer is a pretty good second choice for these fuels. Trangia makes it pretty clear in their product manual that isobutane canisters and white gas are the fuels of choice for this burner. If you intend to use kerosene with this burner (I discourage this fuel for this burner), then the supplied same-size-as-the-Omnifuel (0.28mm) jet that comes with the X2 will need to be used. This turns the burner back into a simmer-disabled Omnifuel burner, so you should use the OmniDawg cap if you decide you absolutely must use kerosene.
Some clever stove users have changed out the jets on their Trangia X2 Multifuel burners so that the X2 runs the same jets as the Omnifuel. For example, using a 0.37mm jet will let you run the X2 burner with white gas at the same power as the Omnifuel. Using a 0.45mm jet will let you run the burner with isobutane at the same power as the Omnifuel. If you intend to do that, it may cause melting of your Trangia windscreen surrounds if you are not careful and attentive. But, using the more powerful jets makes the X2 more like the Omnifuel, and a OmniDawg cap would be the right one to use. If you use a 0.25mm jet with kerosene (not recommended), thereby reducing the output of the burner, you can use the PolarDawg or the DragonTamer. Confusing isn’t it?
Caution! I do not recommend the use of a re-jetted X2 with an OmniDawg cap with the Trangia 27 sets as the small size of the surrounds puts the surrounds too close to the flame. Trangia 25 sets are okay… if you are careful.
Trangia Multifuel Burner 780001 made for Trangia by Optimus – discontinued product
The original Multifuel 780001 burner sold by Trangia was made for them by Optimus and is a stripped-down Nova burner. There are “fins” inside the burner bell of this burner.
The proper silent cap for this burner is the Dawg-A-Nova cap.
Primus 328894 and 328896 Multifuel
The newer 3288 (correctly termed the 328894 or the newer 328896) Multifuel is a reduced feature (no stove-side control spindle) Omnifuel-based stove. Sort of a Omnifuel “lite” stove.

Multifuel 328894 or 328896

For a bit more money you can get a real Omnifuel and the additional cost is well worth it for the control spindle. Because the Omnifuel is also much more popular, you can even commonly find new Omnifuels at discount for prices well below the retail cost of the 328894 or 328896 Multifuel. The 328894 or 328896 Multifuel comes with a reduced size jet set compared to the Omnifuel. While the Omnifuel has 0.45mm, 0.37mm and 0.28mm jets for isobutane, white gas, and kerosene, respectively, the Multifuel comes with 0.37mm, 0.32mm and 0.28mm jets for those fuels. This is why the Omnifuel produces 3000 watts of power while the Multifuel only produces 2700 watts of power. If you plan on mostly kerosene use, get the OmniDawg for this stove. If you plan on white gas or isobutane and intend to use the correct jets for the Multifuel, then you need a slightly less powerful cap like the DragonTamer or the PolarDawg to match up with the lower output of the Multifuel.
You can also “cheat” a bit if you are planning on using white gas by using the 0.37mm jet that came with the Multifuel for white gas. This will increase the white gas flame output and let you use the OmniDawg cap just like with an Omnifuel stove.
Sorry that this is a bit confusing. Primus is marketing a strange beast with the Multifuel. Your best bet is to bypass the odd Multifuel stove and go directly to the full-featured, award-winning, and more powerful Omnifuel.

But, in a nutshell… If yours has the full sized jets (0.28, 0.37, 0.45, 3000W stove) then an OmniDawg cap would be better suited. If yours has the smaller jet set (0.28, 0.32, 0.37, 2700W stove) then the DragonTamer is a better choice.

Primus Himalaya Varifuel 3278 and Multifuel 3288 – discontinued product
These are two long discontinued stoves from Primus that I am often asked about. Both stoves feature small diameter burner bells and smaller jets than the Omnifuel.

Both stoves, the Varifuel 3278 and the Multifuel 3288 work well with the Minicap without Legs, but make sure to get the one without legs – the bell is so narrow that the legged Minicap won’t fit. If you would like the flexibility to use your Minicap on other small self-pressurizing stoves like the Optumus 80, Radius 42, or Svea 123/123R, the Minicap without Legs will work for that, too.

Sorry for any confusion this may cause. Primus and Trangia haven’t been kind to us in naming so many stoves as a “Multifuel”. I hope my post will enable you to select the right cap for your stove.
Happy Camping!
BD

Stuck NRVs??

Hi BernieDawg
I have this great old Primus 100 stove that I’m trying to fettle. I’ve got the NRV loosened up, but it seems to be stuck in the bottom of the pump tube and won’t drop out of the tube. It’s hung up somehow. It wiggles around and is loose down there at the bottom of the pump tube. I wonder if there’s some gunk in the tank that’s hanging it up?
What can I do to get it free?
Sincerely,
Stuck and perplexed
____________________________

Hi Stuck

Well… I think this might make a good blog topic actually, because I get this question and this issue fairly frequently. And, don’t feel bad – it’s common and it happens to me, too. Here’s how I handle it.
1. best thing is to buy a tool which can solve 75% of these sort of stuck NRV issues. What you want is an “ear forceps” aka an “alligator forceps”. They come out of Pakistan (for reasons I don’t understand) for pretty cheap. They are stainless steel. And they help you with other tank related stuff, say reaching into a tank to retrieve something, or at the end of the pump tube in case a rotted leather pump cup gets stuck down there. Check pricing on eBay, but here’s a screen shot of a pair I picked at random just so you can see what I’m talking about:
The larger one is about 6.5″ long and is a great size for pump tube and stove tank work. But, you can get them a lot longer, too. It was selling as a Buy-It-Now with free shipping for only $6.50.
2. next thing is to take your little flashlight and peer into the tank. Is it all black and gooey in there? If it is, then your idea about gooey stuff being on the end of the NRV barrel is probably right. Here’s how to fix that and clean your tank, too. Get a gallon of acetone at Home Depot, Lowes, or wherever. Fill the tank with it. Let it soak (plug the openings with some paper toweling to control evaporation). If you want to get really industrious, you can add some BB’s to the tank and shake it around. Pour out the acetone into a metal or glass container through a coffee filter for reuse – you can reuse it on many tanks. Shake out the BB’s, or use a magnetic pen tool to remove them. Rinse the tank with just a splash of acetone and you should be good to go. Acetone dissolves the black gooey crud (dried kerosene). It will dissolve the gooey crud on the end of the NRV barrel and then it should pop right out. This should take care of another 20% of the problems.
3. two other issues can cause the NRV to hang up in about 4% of cases.
a. there can be a little burr of brass where the vent hole in the side of the NRV barrel was punched in the barrel. You can use your alligator forceps gripping the NRV head with an unscrewing motion (like you are unthreading the NRV) to “unscrew” the burr past the opening in the pump tube end plate. Do it with the pump tube opening facing toward the floor to allow gravity to assist you. Use a little 400 grit wet dry sandpaper or a small file to remove the burr once you’ve got it out so it doesn’t give you problems again.
b. the other problem comes about from using lead NRV head washers. The lead will expand outward when the NRV head is tightened down, sometimes into the opening for the NRV head threads. This can hang up the NRV. Alligator forceps should help you to get it out, again with that unscrewing motion. Consider to switching to HDPE (#2 plastic) NRV head washers. You can punch them from the lids of food containers, so they are cheap to make and they almost never cause these hang-up problems. They last forever, too.
4. Lastly… for that final 1% of stubborn NRVs… if you have compressed air… set the air output to about 40 psi. Hold a rag in your hand over the pump tube opening to catch the NRV. Install the vent screw and apply a little compressed air into the burner mount opening with your thumb over the filler opening. Pop! Out shoots the NRV into the rag in your hand. These can shoot across the shop if you don’t use a rag to catch it and be difficult to fine otherwise.
Hope that helps!
Happy camping!
BD